One thing that I've found about being home with my 1 1/2 year old is that you have to have a keen mind to think of things to DO. There's only so much time that can be spent with play dough, watching the garbage truck and tackling the dog. Before Mali came along, I used to make all sorts of bread - baguettes, fougasses, brioche, beautiful pinwheel and braided breads ... you name it, I made it. When baby came along though, all that went out the wayside. Now that he's a bit older though and likes to pour and scoop and stir, we've started up again and are having a great time. These days, Mali and I make up a loaf of bread every 3-4 days. I'm always asked, "how on earth do you make your own bread with a baby in the house??!!" - the answer, primarily, is that it's something to do. And what a delicious "something"! There's of course the added benefits of of making your own bread: it's inexpensive, it's substantially tastier than store-bought bread, it isn't filled with preservatives and it's super good for you and packed with nutrients. The OT in me also loves all the benefits that come with having your child help you to cook - sequencing, fine motor skills, balance, sensory integration... and so on.
Ordinarily when baking bread, I would mix the dough with my first child stand mixer, but making bread is easy enough that this is just a convenience, not a requirement by any means. Basically, instead of doing the kneading and stirring described below, I just flip a switch and the machine does it for me.
Okay, on with the bread!
Ingredients:
- 2 1/2 cups flour
- 1/2 cups oat mix*
- 2 tbs. sugar
- 1 tbs. milk powder
- 1 tsp. salt
- 1 1/2 tsp. yeast (I like to use bread machine yeast as you can just mix it in)
- 1 1/2 tsp. oil
- 1 1/4 cups water
- 2 tbs. honey
* sometimes these are sold as "porridge oats" - they're sold in the breakfast section of the grocery store and have a nice mix of flax seeds, quinoa, oatmeal etc. I like the "Rogers" brand. You could easily make your own if you have the ingredients on hand. A handful of this and a handful of that!
Directions:
* if you are using a bread maker, just follow your own instructions. The instructions I'm posting are for use with a stand mixer:
1. Combine all of your ingredients in your mixer with the dough hook attachment and mix on medium speed for 5-6 minutes.
* if mixing by hand you'll have to knead your dough on a lightly floured surface until smooth and elastic, which usually takes about 20 minutes. If you are not using bread machine yeast, you will have to let your yeast proof with warm water and sugar first.
2. Lightly oil a large bowl, place the dough in the bowl and turn to coat with oil. Cover with a damp cloth and let rise in a warm place until doubled in volume, about 1 hour.
3. Punch down the dough! My toddler loves this part. Turn your dough out onto a lightly floured surface and use a rolling pin to roll it out into an approximate square that is the length of your loaf pan.
4. Roll your square of dough into a loaf and tuck the ends under. Transfer to a lightly greased 9x5 inch loaf pan. Let rise until doubled in volume, about 30-40 minutes.
5. Bake at 350 degrees F (175 degrees C) for about 25-30 minutes or until the top is golden brown and the bottom of the loaf sounds hollow when tapped. Remove your loaf from the pan and place on a wire rack to cool. Do not let your loaf cool in the pan as it will get damp. Enjoy!
This blog is dedicated to food. Lots and lots of great, homemade food. It's full of my most favourite recipes that I hope you will enjoy too. I welcome your comments, recipe ideas, and suggestions to spice up what you see and.. as always, bon appétit!
Showing posts with label breakfast. Show all posts
Wednesday, March 11, 2015
Friday, February 6, 2015
Buttermilk Biscuits
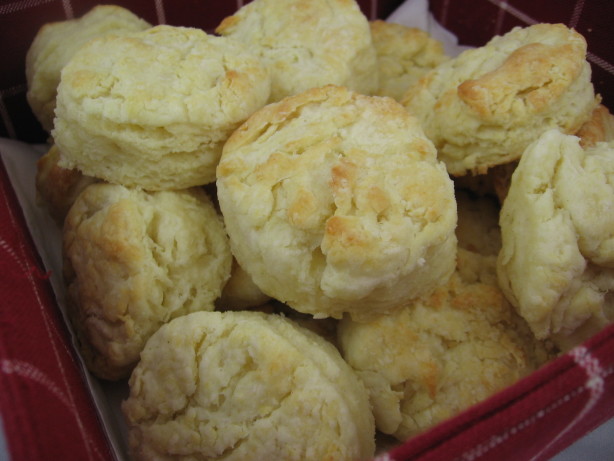
So I haven't been able to do much blogging since my baby was born, but my kitchen has still been busy. Tonight I made up some delicious buttermilk biscuits and hoped that my picky toddler would totally snarf them down - I was in luck! He devoured them. They were flaky with a beautiful golden brown top. One thing that I will say about technique for biscuit making is that the key is not in the ingredients, but in the handling of the dough: handle it as little as possible or you will have tough biscuits. And that's it! Bon appétit!
ps - we found these were great the next morning served with some fresh jam. Another idea would be to use them the next morning for a bacon & egg on a biscuit type a' thing. Num'...
Ingredients:
2 cups all-purpose flour, plus more for dusting the board
1/4 teaspoon baking soda
1 tablespoon baking powder
1 teaspoon salt
6 tablespoons unsalted butter, very cold (I freeze it for 15-20 minutes)
1 cup buttermilk (approx)*
ps - we found these were great the next morning served with some fresh jam. Another idea would be to use them the next morning for a bacon & egg on a biscuit type a' thing. Num'...
Ingredients:
2 cups all-purpose flour, plus more for dusting the board
1/4 teaspoon baking soda
1 tablespoon baking powder
1 teaspoon salt
6 tablespoons unsalted butter, very cold (I freeze it for 15-20 minutes)
1 cup buttermilk (approx)*
*if you do not have buttermilk, you can add 2tbs white vinegar to your 1 cup of milk and let it stand for 10 minutes until the milk thickens slightly. No, it's not REAL buttermilk, but it's still delicious.
Directions:
1. Preheat your oven to 450°F. Grease a baking pan.
2. Combine the dry ingredients in a bowl, or in the bowl of a food processor.
3. Cut the butter into chunks and cut into the flour until it resembles course meal. If you are using a food processor, just pulse a few times until this consistency is achieved.
4. Add the buttermilk and mix JUST until combined. If it appears on the dry side, add a bit more buttermilk. It should be very wet. Turn your dough out onto a floured board.
5. Gently, gently PAT (do NOT roll with a rolling pin) the dough out until it's about 1/2" thick. Fold the dough about 5 times, gently press the dough down to a 1 inch thick. Use a round cutter to cut into rounds. (You can gently knead the scraps together and make a few more)
6. Place the biscuits on a cookie sheet- if you like soft sides, put them touching each other. If you like"crusty" sides, put them about 1 inch apart- these will not rise as high as the biscuits put close together. Bake for about 10 minutes- the biscuits will be a beautiful light golden brown on top and bottom. Do not overbake & watch them very closely!
1. Preheat your oven to 450°F. Grease a baking pan.
2. Combine the dry ingredients in a bowl, or in the bowl of a food processor.
3. Cut the butter into chunks and cut into the flour until it resembles course meal. If you are using a food processor, just pulse a few times until this consistency is achieved.
4. Add the buttermilk and mix JUST until combined. If it appears on the dry side, add a bit more buttermilk. It should be very wet. Turn your dough out onto a floured board.
5. Gently, gently PAT (do NOT roll with a rolling pin) the dough out until it's about 1/2" thick. Fold the dough about 5 times, gently press the dough down to a 1 inch thick. Use a round cutter to cut into rounds. (You can gently knead the scraps together and make a few more)
6. Place the biscuits on a cookie sheet- if you like soft sides, put them touching each other. If you like"crusty" sides, put them about 1 inch apart- these will not rise as high as the biscuits put close together. Bake for about 10 minutes- the biscuits will be a beautiful light golden brown on top and bottom. Do not overbake & watch them very closely!
Labels:
baking,
biscuits,
breakfast,
buttermilk,
buttermilk biscuits
Friday, January 18, 2013
Baked Oatmeal
"Baked Oatmeal" was a new term for me up until a couple years ago when Jerms' grandpa married again to his delightful new wife, Glennis. This recipe comes all the way from Pennsylvania and is breakfast bliss. I'd recommend this dish if you're having a big crew for breakfast and don't want too much hassle to go along with it. The great thing about making baked oatmeal is that you can prepare the dish the night before and then just pop it in the oven the following morning. I decided to make up a fresh-blueberry addition, but you can do all sorts of different ingredients that spark your interest and appetite (raisins, cinnamon/nutmeg, peaches, bananas, etc. etc.). Bon appetite!
* I usually double this recipe for 4 or more people.
Ingredients:
1/3 Cup vegetable oil
1/2 c. sugar (I use brown)
1 egg beaten
1/2 tsp. vanilla
2/3 c. milk
2 c. oats
1 1/2 tsp. baking powder
1 tsp salt
raisins or blueberries optional
Directions:
Mix everything in an oval pan. Bake for 20-30 minutes at 350.
1/3 Cup vegetable oil
1/2 c. sugar (I use brown)
1 egg beaten
1/2 tsp. vanilla
2/3 c. milk
2 c. oats
1 1/2 tsp. baking powder
1 tsp salt
raisins or blueberries optional
Directions:
Mix everything in an oval pan. Bake for 20-30 minutes at 350.
I often make it up the night before and just turn the oven on in the morning. If you are adding fruit, add it the morning of to prevent significant smearing.
photo cred to the family kitchen - my camera had run out of batteries :(
Saturday, January 12, 2013
Jeremiah's Pancakes (lactose free)
For breakfast this morning we made up a nice batch of pancakes with some fruit salad on the side. A perfect Saturday morning "fun breakfast" as it's referred to in our house. I will admit that I am not exactly a "pancake person" (hisses and boos from all Canadians, I know, I know) - but I just LOVE these guys. We first got this recipe from our very dear friend when we hiked through Frontenac Park earlier this summer. The nice thing about it is that it has no dairy products - ie. great for those are are intolerant to lactose. They make up such an incredibly light, fluffy little pancake - it's amazing that there's no milk in them. I find that this recipe makes enough for about 3-4 people. We make a half batch for 2 people for breakfast. Enjoy!
Ingredients:
2 cups flour
4 tsp baking powder
2 eggs
2 tbsp oil
2 tbsp sugar
1/2 tsp salt
2 cups water
1/2 tsp vanilla extract
Directions:
Mix all of your dry ingredients together. Add wet ingredients and stir until just moistened (the batter will still be a little lumpy... that's okay!). Heat some oil on medium heat in a large skillet. When the pan is nice and hot, add 1/3 cup servings of batter - flip when bottom is lightly browned and you start to see little bubbles on the top of the pancake. Serve with maple syrup!
Ingredients:
2 cups flour
4 tsp baking powder
2 eggs
2 tbsp oil
2 tbsp sugar
1/2 tsp salt
2 cups water
1/2 tsp vanilla extract
Directions:
| The man himself, making up pancakes in the bush |
Labels:
breakfast,
lactose free,
lactose free panckes,
maple syrup,
pancakes
Saturday, February 4, 2012
Cinnamon Raisin French Toast
After this last round of back surgery, my mummy came up to look after me for a few days. She brought along a special treat of freshly-baked cinnamon raisin bread (yummmmm...). This morning we decided to use it for our weekly Giles Saturday morning brunch meal. I heart Saturday mornings. Ok, so who doesn't? Saturday mornings at Chez Giles' always consist of a nice sleep in, morning snuggles, special breakfast and then coffee and tea on the couch. You can use any kind of bread for making french toast, but I have to admit that using homemade bread (especially your mum's homemade cinnamon raisin bread!) will definite elevate it to a cut above the rest. Bon appétit!

Ingredients:
8 slices cinnamon raisin bread
1 cup milk/cream mixture (I like 3:1 ratio milk to cream)
1 large egg
2 tbsp sugar
2 tsp vanilla extract
3/4 tsp cinnamon
pinch of salt
Directions:
1. Mix milk/cream, egg, sugar, vanilla, cinnamon, and salt. Dip each piece of bread into the batter, flipping after 30 seconds to fully saturate bread.
2. On a griddle or a hot skillet, melt 1 tbsp of butter and place dipped bread on hot surface. Cook each side until crispy and beginning to brown (approximately 2-3 minutes per side ... watch carefully so it doesn`t burn!). Serve up with fresh maple syrup!
Ingredients:
8 slices cinnamon raisin bread
1 cup milk/cream mixture (I like 3:1 ratio milk to cream)
1 large egg
2 tbsp sugar
2 tsp vanilla extract
3/4 tsp cinnamon
pinch of salt
Directions:
1. Mix milk/cream, egg, sugar, vanilla, cinnamon, and salt. Dip each piece of bread into the batter, flipping after 30 seconds to fully saturate bread.
2. On a griddle or a hot skillet, melt 1 tbsp of butter and place dipped bread on hot surface. Cook each side until crispy and beginning to brown (approximately 2-3 minutes per side ... watch carefully so it doesn`t burn!). Serve up with fresh maple syrup!
Subscribe to:
Posts (Atom)