Tuesday, June 28, 2011

Classic Coleslaw

Such a classic summer dish. So versatile and fresh on a hot summer day. As an FYI, these measurements are what one might call strongly "guesstimated" as I really didn't measure anything at all. Just go for it - any combination you make will probably taste great and "coleslaw" is a very loose term anyways. I don't like my coleslaw very 'mayonnaisey' but many folks do so feel free to play around with the quantities of ingredients. I also recently heard of a 'blueberry coleslaw' that I think I'll have to try (and post!) sometime soon. Bon appétit folks!

Ingredients
1 cabbage
2/3 cup creamy salad dressing (like Miracle Whip)
3 tablespoons vegetable oil
1/2 cup white sugar
1 tablespoon cider vinegar
1 apple
1/4 teaspoon salt
1/2 teaspoon poppy seeds

Directions
1. Thinly chop your cabbage, shred carrot & apple and combine in a large bowl.

2. Whisk together the salad dressing, vegetable oil, sugar, vinegar, salt, and poppy seeds in a medium bowl; blend thoroughly. Pour dressing mixture over coleslaw mix and toss to coat. Chill before serving.

Monday, June 27, 2011

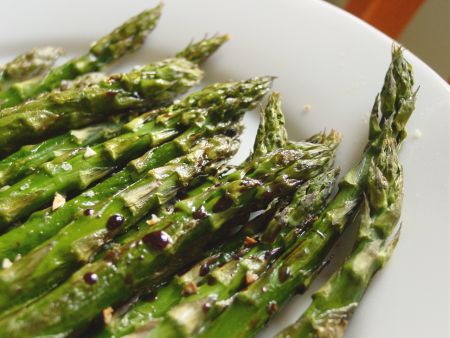
Garlicky Roasted Asparagus

I love asparagus. Among all the vegetables, it's probably one of my favourite (besides baby spinach maybe... and broccoli, I also really love broccoli). I have recently been thinking of growing my own in the garden - have any of you ever tried growing asparagus? Everything I have read though says that it will probably take at least  three years before I can chew on a homegrown asparagus stalk. Three years. That will make me 30. Hmm. Homegrown asparagus + 3 years = 30. I can only hope to harvest my own 30 asparagus by the time I hit 30. Gardening certainly teaches one to be patient. 

This is a delicious, vibrant side. Having a quality garlic press will make things a WHOLE lot easier for you. Easy goes it on the oil though as these guys can get quite oily quite quickly. Bon appétit!


Ingredients
2 pounds asparagus, trimmed
2 tablespoons olive oil
4 garlic cloves, thinly sliced or pressed
Coarse salt and ground pepper

Directions
Preheat oven to 400 degrees. On a large rimmed baking sheet, toss asparagus with oil and garlic; season with salt and pepper. Roast until tender and browned in spots, 15 to 18 minutes. Serve warm or at room temperature.

- recipe cred Everyday Food; picture EEE Cooks

Sunday, June 26, 2011

Mango Chicken Salad

Yum. So easy. So simple. So tasty. And, possibly best of all, it's so darn good for you. What more can I say? Bon appétit!

Ingredients
4 cups arugula (or any other greens)
1 mango, peeled and sliced into 1-inch-long pieces
1 red pepper, trimmed, seeded, and sliced into 1-inch-long pieces
1 tablespoons extra-virgin olive oil
1/2 teaspoons balsamic vinegar
Sea salt
2 teaspoons honey
1 teaspoons Dijon mustard
1 boneless chicken breast (about 4 ounces)
1/4 cup slivered almonds
+ anything else you like in your salad!

Directions
1. In a large bowl, combine arugula, mango, and red pepper. In another, smaller bowl, whisk together olive oil, vinegar, and a pinch of salt. Set aside.

2. In a shallow, wide bowl, stir together honey and mustard. Add chicken and toss to evenly coat.

3. Grill chicken over medium-high heat (or cook in a skillet with 2 teaspoon olive oil) until golden brown, 8 to 10 minutes, turning once halfway through. When done, chicken should register about 165 degrees on a meat thermometer, and juices should run clear when pierced with a knife. Transfer to a cutting board and let sit 5 to 7 minutes.

4. Slice chicken into 1-inch-long pieces. Add to salad; toss to combine. Add balsamic vinaigrette and almonds; toss again before serving.

- recipe & photocred Delish.com

Saturday, June 25, 2011

BBQ'ed Jerk Chicken

Homemade jerk chicken? Oh soooooo good. Such authentic flavours and smells, I`m telling you guys - it was truly amazing man. We have a pre-made jerk seasoning that we often use to make this dish, but today I felt like trying to make this recipe from scratch. The result? I`m throwing out that pre-fab crap. It just didn`t compare. Jerk seasoning, if you are unfamiliar with it, is based on two main ingredients - chili peppers (or habaneros) and allspice, and is a Caribbean staple. You can make your seasoning plenty spicy if that`s what floats your boat and the leftovers are great the next day in a chicken salad. Serve up with some plantains or rice and a very large glass of über cold beer.Warning: this is a marinading dish that takes a couple of hours so you`ll want to try this recipe on a Saturday or possibly even prepare it the night before or something. Taking the time to marinade the chicken REALLY pays off so it`s not a step you want to skip.  Bon appétit!


Ingredients
1 bunch scallions, chopped (3/4 cup)
1 garlic cloves, chopped
1/2 a jalapeno chile, chopped (ribs and seeds removed, for less heat)
1 tablespoon freshly squeezed lime juice
1 tablespoon olive oil, plus more for grates
1/2 tablespoon light-brown sugar
1 teaspoons ground allspice
1/2 teaspoon dried thyme
1/4 teaspoon ground cinnamon
Coarse salt
4 pieces bone-in chicken (drumsticks and thighs), skinned and trimmed of excess fat

Directions
1. Make marinade: In a blender, combine scallions, garlic, jalapeno, lime juice, oil, sugar, allspice, thyme, cinnamon, 1/2 teaspoon salt, and 1 tablespoon water; blend until smooth. Set aside 1/8 cup for brushing.

2. Place chicken in a shallow dish; season all over with salt. Pour remaining marinade over chicken; toss to coat. Cover; refrigerate, turning once or twice, at least 2 hours, or up to overnight.

3. Heat grill to medium-high; oil grates. Lift chicken from marinade, letting excess drip off (discard marinade); place on grill, and cover. Cook, turning occasionally, until chicken is blackened in spots, about 10 minutes.

4. Move chicken to a cooler part of the grill; brush with reserved marinade. Grill, covered, until chicken is cooked through, 10 to 15 minutes more. Serve immediately.

Monday, June 20, 2011

Shrimp Scampi

"Shrimp scampi". Sounds so gourmet that it must be incredibly difficult - right? Heck no. Cooking up this dish will testify to the fact that fancy does not always mean hours in the kitchen. Scampi is possibly one of the the most popular ways to cook up shrimpies and the nice thing about it is that it's super easy and super quick (no more than 10 minutes from start to finish - booya!).

For this recipe, you can use either raw or precooked shrimp. If you are using the precooked variety, cook them just long enough to heat them and coat them with that wonderful garlic butter sauce. You'll need to thaw them first though and don't forget to rinse em' out. We served our shrimp with sides of baked sweet chili sweet potatoes and oven asparagus. Bon appétit!

Ingredients:
About a dozen large shrimp
2 tablespoons butter
2 tablespoons minced garlic
2 green onions, thinly sliced
1/8 cup dry white wine
1 tablespoon lemon juice, fresh if possible + zest
1 tablespoon chopped fresh parsley
salt and pepper, to taste

Directions:
1. Rinse shrimp and set aside. Heat butter in large skillet over medium heat. Cook garlic 1 or 2 minutes or until softened but not browned.

2. Add shrimp, green onions, wine, zest and lemon juice; cook until shrimp are pink and firm, about 1 to 2 minutes on each side. Do not overcook.

3. Add chopped parsley and salt and pepper before serving. Garnish with lemon slices and parsley sprigs if desired.


- recipe cred Diana Rattray

Thursday, June 9, 2011

Stove-Top Popcorn

Anyone who knows me knows that I love stove-top popcorn. Just love it. I feel that it's almost a lost art that needs to be preserved and passed down to the generations to follow. My Papa died when I was only 4-5 and one of the very few memories that I have of him is him shaking away the popcorn pot at the stove - sparks flying from the friction on the electric burner! So why should you make popcorn on the stove-top and not just throw in a package of the microwave variety? Well, there's a couple of reasons:

1) With homemade popcorn, you can control the amount of butter and salt. 
2) You don't get that icky film on the roof of your mouth from the artificial flavourings in microwave popcorn. 
3) Stove top popcorn has a much richer taste and you end up with significantly less left-over non-popped kernels
4) Making your own popcorn is much, MUCH cheaper than buying the microwave packs. For less than the price of a box of 3 microwave popcorn packs, you can buy a bag of popcorn and get 33 batches out of it. Yes, 33. You just can't beat that. Bon appétit!

Ingredients:
3 Tbsp vegetable oil (essentially, just enough to cover the bottom of your pot)
1/4 cup popcorn kernels
3 Tbsp butter, melted
Salt to taste

Directions:
On medium high heat, add the oil and 1-2 kernels to a large pot. Once the kernels pop, add the remaining kernels and immediately cover the pan. Shake the pot constantly (and I mean SHAKE IT!) until you don't hear any more popping, about 2 minutes. Remove pan from heat and pour popcorn into a large bowl. Drizzle the melted butter over the popcorn and season with salt.

ps - if you'd like a video tutorial, click here :)

Wednesday, June 8, 2011

Orange & Thyme Grilled Shrimp

More grilled shrimp, what can I say? It's so delicious! This recipe makes up a tasty little dipping sauce that can also be used as a salad dressing. I'm dedicating this recipe to my dear friend and babysitting buddy, Farnaz. This was my first attempt at making dinner with a 1 year old ... needless to say, I did a lot of "supervising". I did make the marinade myself though and surrendered to my love affair of cooking with oranges. The oranges truly were really loved today. So loved that I grated off all their fragrant zest and reamed the crap out of them to steal all their juices. I hope they know they are appreciated. We served these shrimpies up with a nice plate of greens and some naan. Bon appétit!

Ingredients
1 pound large shrimp (about 24), peeled and deveined, tails on
1 1/2 teaspoons grated orange zest, plus 1/2 cup fresh orange juice
2 garlic cloves, minced
2 tablespoons olive oil, plus more for grates
1 tablespoon plus 1 teaspoon chopped fresh thyme
Coarse salt and ground pepper
1/3 cup light mayonnaise

Directions
1. In a shallow dish, combine shrimp, 1 teaspoon zest, 1/4 cup juice, garlic, oil, 1 tablespoon thyme, 1/2 teaspoon salt, and teaspoon pepper; toss to coat. Marinate in the refrigerator for 30 minutes (or up to 8 hours). Soak eight 8-inch wooden skewers in water 30 minutes before cooking.

2. In a small bowl, combine mayonnaise, remaining 1/2 teaspoon zest, remaining 1/4 cup juice, and remaining 1 teaspoon thyme; season dipping sauce with salt and pepper.

3. Heat grill to medium; lightly oil grates. Thread shrimp onto skewers, and grill, turning once, until shrimp are opaque throughout, 3 to 4 minutes. Serve shrimp with dipping sauce.

- recipe and photo cred to Martha Stewart Everyday Food

Tuesday, June 7, 2011

Bok Choy, Carrot & Apple Colslaw

This coleslaw turned out to be quite a treat. I had never thought about using bok choy in coleslaw before but why not? It's cabbage pure and simple. Bok choy is so darn good for you too. A big boost of Vitamins A & C. The carrots and great for your eyes too. The freshly grated ginger gave the dish quite a zingy flavour. While talking ginger, I highly recommend that you stick to the suggested 1tsp and don`t overdo it or the ginger can totally take over the flavour. One final note is that this recipe has no mayonnaise, which is nice - just natural flavours from the sweet apple, peppery bok choy, and tangy lemon juice. We served this up with some classic grilled hamburgers. Bon appétit!

Ingredients
1 pound baby bok choy (4 to 6 heads)
1 teaspoon coarse salt
1 peeled apple, cut into matchsticks
2 large shredded carrots
1 tablespoon finely chopped red onion
3 tablespoons fresh lemon juice
1 tablespoon vegetable oil
1 teaspoon finely grated peeled fresh ginger
Coarse salt and ground pepper

Directions
1. Halve baby bok choy lengthwise; rinse under cold water to remove grit. Cut crosswise into thin strips; place in a large colander, and sprinkle with coarse salt. Toss to coat. Top with a plate that fits inside colander; weight with a heavy object (such as a skillet or canned goods). Set aside in sink to drain.

2. In a large bowl, mix apple, carrots, lemon juice, vegetable oil, and peeled fresh ginger. Add bok choy; season with coarse salt and ground pepper. Toss.
- photo cred delish.com

Saturday, June 4, 2011

BBQ'ed Tilapia with Cherry Salsa

I felt like quite the chef preparing this dish. I think that any kind of 'cherry' dish will make you feel that way; that, or making your own "salsa" (Martha tends to think outside the salsa box that's for sure). And who doesn't love nice, fresh cherries? And bbq'ed fish? Oh boy. Even if you don't have the time, or the ingredients, to make up the cherry salsa, just preparing  the salted coriander rub for your fish is enough to highly elevate its deliciousness. Paired with a crunchy, feta-topped arugula salad - mmm mmm. I'd recommend chopping up the cherries a little more than what you see in my picture (I halved them) to spread out the cherry flavour a bit more. You could also easily make this salsa with other kinds of fruit like grapes, peach or mango ... or try it with other fishes! Bon appétit!


Ingredients
1 tablespoon olive oil, plus more for grill grates
1/2 pound (2 cups) cherries, pitted and coarsely chopped
1/2 small red onion, finely chopped
1/4 cup fresh cilantro, chopped
1 jalapeno chile (ribs and seeds removed), minced
1 tablespoon fresh lime juice
coarse salt and ground pepper
1/2 teaspoon ground coriander
4 tilapia fillets (4 to 6 ounces each)

Directions
1. Heat grill to high; lightly oil grates. In a medium bowl, combine cherries, onion, cilantro, jalapeno, and lime juice. Season with salt and pepper, and toss to combine; set salsa aside.

2. In a small bowl, stir together coriander, 1 teaspoon salt, and 1/4 teaspoon pepper. Rub tilapia all over with oil; sprinkle with spice mixture.

3. Grill tilapia until opaque around the edges and underside loosens easily from grill, 2 to 3 minutes. Using a metal spatula with a thin blade, flip fish; continue to cook until opaque throughout, 2 to 3 minutes. Serve tilapia topped with cherry salsa.

Friday, June 3, 2011

Tomato and Avocado Salsa

This is such a nice, bright summer salad that is super easy and super yummy. Having a couple of different coloured tomatoes definitely ups the colour palate in this recipe - I had a lot of fun picking out big, small, green and orange tomatoes at the grocery store.  We served this dish with Jerk Chicken on the BBQ (to follow!). Enjoy and as always... bon appetit!


Ingredients
2 pounds assorted tomatoes (any color), sliced or halved if small
1 avocado, halved, pitted, peeled, and sliced
Extra-virgin olive oil
Dash of lemon juice
1 tbs balsamic or cider vinegar
Coarse salt and ground pepper

Directions
On a large plate or platter, arrange tomatoes and avocado. Drizzle with olive oil, balsamic vinegar (or cider vinegar would be nice too), a dash of lemon juice and season with salt and pepper.

- Photo cred Martha Stewart, recipe adapted from Everyday Food

Tandoori Chicken Kabobs

Well, the mercury hit 30C on Monday. Hot time summer in the city. The hottest day of the year so far. I was walking home from work and felt like my poor feeties might melt in to the pavement. The AC was busted and it`s days like that that I say "thank you Lord for the bbq!" With CBC Radio 3 playing in the background, I present to you this delicious bbq dish. It's pretty simple but does take a bit of prep (calls for 2 hours of marinading). Admittedly we marinated it for 0 hours and it still tasted great. We reserved a bit of the sauce for serving given the fact that we skipped the marinating state. Get ready for electric yellow chicken! Bon appétit!


Ingredients
2 tablespoons fresh lime juice
4 garlic cloves
1 piece fresh ginger (2 inches)
2 jalapeno chiles, chopped
1 cup plain yogurt
1 tsp turmeric
8 boneless, skinless chicken thighs (about 1 3/4 pounds)

Directions
1. In a blender (or with a hand mixer), puree lime juice, turmeric, garlic, ginger, and chiles. Add yogurt, and blend until smooth.

2. Halve each chicken thigh lengthwise. Thread 4 chicken pieces on each of 4 long skewers. Arrange skewers in a nonmetallic dish; pour marinade over, and turn to coat. Cover; refrigerate at least 2 hours or up to overnight, turning periodically.

3. Heat grill to high; lightly oil grates. Place skewers on grill. Cover grill; cook, turning occasionally, until grill marks are visible and chicken is no longer pink in the center, 8 to 10 minutes.