Thursday, December 24, 2015

Homemade Chocolate Coconut Mounds Bars

So... these homemade delicacies are pretty divine. I think that if Jesus had a favourite chocolate bar, it'd be one of these little guys. They are super sweet and delicious, look amazing and pair so nicely with a cup of tea or coffee (or for breakfast when you're pregnant... or not even when you're not...). And hey, there's only 4 ingredients - how easy is that?


I wanted to share a few things that I learned from making these a couple of times now:
- do not skip on the coconut extract. I made the first batch without any and they were good, but they didn't have that big, coconutty 'umph' that I was hoping for. Using an extract is where it's at!
- follow the instructions on melting chocolate closely and do not be tempted to "thin" the chocolate to make it easier to coat. I thought that if I added a splash of cream to the chocolate that it would just make it a little thinner, but nope - it created a giant ball of squishy goo.
- keeping your mounds bars in the fridge will make the chocolate dry and crack a lot faster. I wouldn't recommend it
- one similar recipe that I saw made 'almond joys' by rolling the filling into a parchment paper log to facilitate the forming stage. I didn't try this personally, but the author ended up with nicely shaped little bars... just at thought! 
- I'll warn you that the chocolate dipping stage is a bit of a pain and you'll be silently cursing that they don't look "perfect", but just do your best! There isn't much getting around having them look "homemade", but your friends will love you all the more for them.  You may need to re-warm your chocolate a few times along the way.

Bon appétit! 


Ingredients:
15 oz milk cooking chocolate (I used 2 packages of milk chocolate chips)
3 cups flaked sweetened coconut
1 cup sweetened condensed milk
3 tsp. coconut extract (or, to taste)
* parchment paper

Directions:
1. In a medium bowl, mix coconut, sweetened condensed milk and coconut extract to make a thick and sticky paste.

2. Using your hands, form some rectangles with the paste. Press firmly to make sure the rectangles will keep their shape. Every 3 or 4 rectangles, wash your hands and do not dry them completely. That way, the paste won't stick on your hands.


3. Arrange on a baking sheet lined with parchment paper and put in the freezer for about 20 minutes. This will make the candy easier to dip in chocolate. Don't skip this part or it'll be a mess!

4. In the meantime, put 2/3 of your chocolate it in a microwave safe bowl. Microwave on medium power for 30 seconds, stir, then repeat in 15 seconds interval until the chocolate has melted. 

5. Add 1/3 remaining chocolate and keep stirring until it is fully melted. It's called tempering chocolate. It will allow the chocolate to have a glossy texture and to set correctly.

6. It's time for dipping now! Remove rectangles from the freezer 2 at a time and leave the rest in the freezer to stay firm. Using two forks, dip one rectangle in melted chocolate and roll it to cover all sides. Using one fork, remove rectangle from chocolate. With the other fork, remove excess chocolate and arrange your bounty on a parchment paper lined baking sheet. 


7. I finished mine off by drizzling some chocolate over top. Add some leftover chocolate to a small ziplock bag and cut a TINY little hole in the corner. Pipe your chocolate and let set for a couple of hours. Enjoy!


Wednesday, March 11, 2015

Honey Oat Bread

One thing that I've found about being home with my 1 1/2 year old is that you have to have a keen mind to think of things to DO. There's only so much time that can be spent with play dough, watching the garbage truck and tackling the dog. Before Mali came along, I used to make all sorts of bread - baguettes, fougasses, brioche, beautiful pinwheel and braided breads ... you name it, I made it. When baby came along though, all that went out the wayside. Now that he's a bit older though and likes to pour and scoop and stir, we've started up again and are having a great time. These days, Mali and I make up a loaf of bread every 3-4 days. I'm always asked, "how on earth do you make your own bread with a baby in the house??!!" - the answer, primarily, is that it's something to do. And what a delicious "something"! There's of course the added benefits of of making your own bread: it's inexpensive, it's substantially tastier than store-bought bread, it isn't filled with preservatives and it's super good for you and packed with nutrients. The OT in me also loves all the benefits that come with having your child help you to cook - sequencing, fine motor skills, balance, sensory integration... and so on.

Ordinarily when baking bread, I would mix the dough with my first child stand mixer, but making bread is easy enough that this is just a convenience, not a requirement by any means. Basically, instead of doing the kneading and stirring described below, I just flip a switch and the machine does it for me.

Okay, on with the bread!

Ingredients:
- 2 1/2 cups flour
- 1/2 cups oat mix*
- 2 tbs. sugar
- 1 tbs. milk powder
- 1 tsp. salt
- 1 1/2 tsp. yeast (I like to use bread machine yeast as you can just mix it in)
- 1 1/2 tsp. oil
- 1 1/4 cups water
- 2 tbs. honey

* sometimes these are sold as "porridge oats" - they're sold in the breakfast section of the grocery store and have a nice mix of flax seeds, quinoa, oatmeal etc. I like the "Rogers" brand. You could easily make your own if you have the ingredients on hand. A handful of this and a handful of that!

Directions:
* if you are using a bread maker, just follow your own instructions. The instructions I'm posting are for use with a stand mixer:

1. Combine all of your ingredients in your mixer with the dough hook attachment and mix on medium speed for 5-6 minutes.
* if mixing by hand you'll have to knead your dough on a lightly floured surface until smooth and elastic, which usually takes about 20 minutes. If you are not using bread machine yeast, you will have to let your yeast proof with warm water and sugar first.

2. Lightly oil a large bowl, place the dough in the bowl and turn to coat with oil. Cover with a damp cloth and let rise in a warm place until doubled in volume, about 1 hour.

3. Punch down the dough! My toddler loves this part. Turn your dough out onto a lightly floured surface and use a rolling pin to roll it out into an approximate square that is the length of your loaf pan.

4. Roll your square of dough into a loaf and tuck the ends under. Transfer to a lightly greased 9x5 inch loaf pan. Let rise until doubled in volume, about 30-40 minutes.

5. Bake at 350 degrees F (175 degrees C) for about 25-30 minutes or until the top is golden brown and the bottom of the loaf sounds hollow when tapped. Remove your loaf from the pan and place on a wire rack to cool. Do not let your loaf cool in the pan as it will get damp. Enjoy!

Friday, February 6, 2015

Buttermilk Biscuits

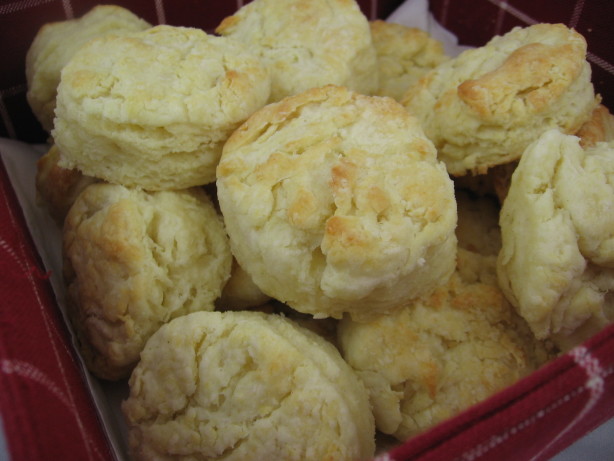
So I haven't been able to do much blogging since my baby was born, but my kitchen has still been busy. Tonight I made up some delicious buttermilk biscuits and hoped that my picky toddler would totally snarf them down - I was in luck! He devoured them. They were flaky with a beautiful golden brown top. One thing that I will say about technique for biscuit making is that the key is not in the ingredients, but in the handling of the dough: handle it as little as possible or you will have tough biscuits. And that's it! Bon appétit!
ps - we found these were great the next morning served with some fresh jam. Another idea would be to use them the next morning for a bacon & egg on a biscuit type a' thing. Num'...

Ingredients:
2 cups all-purpose flour, plus more for dusting the board
1/4 teaspoon baking soda
1 tablespoon baking powder
1 teaspoon salt
6 tablespoons unsalted butter, very cold (I freeze it for 15-20 minutes)
1 cup buttermilk (approx)*

*if you do not have buttermilk,  you can add 2tbs white vinegar to your 1 cup of milk and let it stand for 10 minutes until the milk thickens slightly. No, it's not REAL buttermilk, but it's still delicious.

Directions:
1. Preheat your oven to 450°F. Grease a baking pan.

2. Combine the dry ingredients in a bowl, or in the bowl of a food processor.

3. Cut the butter into chunks and cut into the flour until it resembles course meal. If you are using a food processor, just pulse a few times until this consistency is achieved.

4. Add the buttermilk and mix JUST until combined. If it appears on the dry side, add a bit more buttermilk. It should be very wet. Turn your dough out onto a floured board.

5. Gently, gently PAT (do NOT roll with a rolling pin) the dough out until it's about 1/2" thick. Fold the dough about 5 times, gently press the dough down to a 1 inch thick. Use a round cutter to cut into rounds. (You can gently knead the scraps together and make a few more)

6. Place the biscuits on a cookie sheet- if you like soft sides, put them touching each other. If you like"crusty" sides, put them about 1 inch apart- these will not rise as high as the biscuits put close together. Bake for about 10 minutes- the biscuits will be a beautiful light golden brown on top and bottom. Do not overbake & watch them very closely!