Wednesday, July 27, 2011

Blackened Cayenne Chicken

Remarkably, it's now been almost 2 months since we last made dinner inside. I'm sure that this is doing wonders for our electricity/AC costs. Instead of using a pre-made spice rub, why not make your own? This rub uses ingredients that you should be able to find in your own spice cupboard and is delicious! The more cayenne you add the spicier it'll be :)  I guess our finished product didn't exactly blacken per se, but I'm sure you could end up with that result if you were ambitious enough.  Bon appétit!


Ingredients
1 tablespoon olive oil, plus more for grill
1 teaspoon paprika
2 teaspoons ground pepper
1 1/2 teaspoons coarse salt
1 teaspoon cayenne pepper
1/2 teaspoon dried oregano
1/2 teaspoon dried thyme
1 garlic clove, minced
4 bone-in, skin-on chicken breast halves (2 1/2 pounds total)

Directions
1. Set up a grill for indirect cooking over medium-high. Clean and lightly oil hot grill. In a bowl, combine paprika, ground pepper, salt, cayenne, oregano, thyme, garlic, and oil; rub on chicken.

2. Grill chicken, skin side down, directly over heat source until skin is browned, about 4 minutes. Flip chicken; move to cooler side of grill. Cover grill and cook chicken until cooked through, 35 to 40 minutes. Transfer to a platter and tent with foil. Let chicken rest 10 minutes.

Recipe cred Everyday Food

Tuesday, July 26, 2011

BBQ'ed Sweet Chili Chicken Pizza

Mum Giles, this recipe is for you! 


Now how cool is this recipe? I mean really? BBQ'ing pizza. Wow. Had never done that before. This recipe may be taking the whole grilling experience to a new level. The ultimate BBQ adventure. You'll definitely want a buddy when you're making this dish because it can move REALLY quickly. The important thing to note is that when you first put your dough on the grill, you are initially cooking the top side of the pizza that will eventually house your ingredients on (seems backwards... I know!).  It will become obvious as you prepare your pizza, but just to clarify things:
1) the side of the dough you oil will eventually be the top side of the pizza (this side is cooked down first)
2) when the top side is cooked, flip the dough (so that the cooked side is on top) and add your toppings
3) put your 1/2 cooked dough with the toppings now on it back on the grill (toppings up of course :)

Depending on your ingredients, you may want to toss your pizza in the oven to broil it for a minute or two before serving. Bon, bon appétit!


Ingredients
3 tablespoons olive oil
All-purpose flour, for shaping dough
1 pound pizza dough (either purchase at store, or, better yet make your own)
Sauce: Sweet Chili Sauce for Chicken*
Pizza toppings: cooked chicken, scallions, crumbled goat cheese, avocado, red onion, red pepper, grated cheese etc.

* a note on the sauce: this is not garlicky or spicy, but rather a nice sweet sauce with a hint of chili spice. The bottle looks something like this:

Directions
1. Heat grill to medium. Brush a large rimless baking sheet (or an inverted rimmed sheet) with 1 tablespoon oil (we use our panini press sheets). On a lightly floured work surface, roll and stretch dough to two 8-inch ovals or rounds. Transfer to prepared sheet. Brush tops with 1 tablespoon oil.

2. Place crusts on your baking sheets oil side down. Transfer dough to grill. Cook, without turning over, until undersides are firm and begin to char, 2 to 3 minutes. Using tongs and a large spatula,

3. Scatter crusts with sweet chili sauce, grilled chicken, scallions, cheese, red onion and red pepper; and slide back onto grill. Cook, rotating occasionally, until cooked through and cheese begins to melt, 3 to 5 minutes.  Be very careful to watch your crust to ensure it doesn`t burn. Transfer to a cutting board.

4. Serve with some nice avocado and spinach on top. You may need to broil your pizza in the oven for a couple of minutes if you want that grilled top look. It will certainly be grilled on the bottom though. Enjoy!

Grilled Lemon Garlic Chicken

This is such an easy, tasty dish. No marinading. Just lemony deliciousness on your plate in 1/2 an hour. I definitely recommend working with thinner pieces of chicken so that they cook through quickly and evenly (and so that you don't end up with charred chicken on the outside, pink totally uncooked chicken on the inside). Oh to the hot days of summer.... so perfect for the bbq. Bon appétit!

Ingredients:
2 tablespoons fresh lemon juice
2 tablespoons extra-virgin olive oil, plus more for grill
1 small garlic clove, minced
1 tsp freshly cracked pepper
8 boneless, skinless chicken thighs (about 2 pounds total)

Directions
1. Heat grill to high; lightly oil grates. Mince 1 garlic clove, and place in a shallow dish. Add lemon juice and 1 tablespoon oil; season with salt and pepper. Add chicken, and toss to coat. Let stand at room temperature at least 5 minutes (and up to 30).

2. Brush bread on both sides with remaining 2 tablespoons oil; season with salt and pepper. Grill bread until beginning to char, about 1 minute per side. Cut remaining garlic clove in half, and rub cut sides over grilled bread; set bread aside (discard garlic clove).

3. Grill chicken until opaque throughout, 1 to 3 minutes per side. Serve with fresh lemon wedges.

- recipe and photo cred to Everyday Food

Monday, July 25, 2011

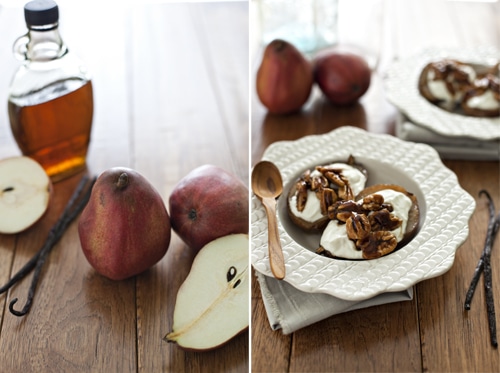
Pears Glazed with Maple Syrup

Who doesn't love a nice, fresh pear? This dessert is really quite lovely for the pear lovers out there. It would make a nice brunchy-breakfast too. Make sure not to skip the lemon juice step as this is important for ensuring that the pears don`t brown too quickly. The original recipe called for fresh heavy cream, but I`ve suggested going with yoghurt for a slightly more healthier bent. Picking up some nicely pressed yoghurt would be just devine with this dish. If it`s a special occasion though, go for it with the cream. No regrets. A big thanks to my mum for finding this recipe for us. Bon appétit!

Ingredients1/2 cup heavy cream (or substitute yoghurt for a healthier twist)
1/4 teaspoon ground cardamom
1/4 teaspoon vanilla
3 Comice pears (about 1 3/4 pounds)
1 tablespoon lemon juice
1 1/2 tablespoons unsalted butter
3 tablespoons pure maple syrup
handful of roasted walnuts, pecans or almonds

Directions
1.In a chilled mixing bowl, combine cream, vanilla and cardamom and whip until cream holds soft peaks. Alternatively, mix cardamom and vanilla with fresh plain or pressed yoghurt. Refrigerate, covered.

2.Quarter or half pears, core, and peel. If desired, cut quarters in half. Sprinkle with lemon juice.

3.Melt butter in a large skillet over medium-high heat. Arrange pears in skillet and cook on one side until pears just begin to brown, about 3 minutes. Add maple syrup and cook until pears are tender, about 1 minute more. Turn pears and cook for another minute. Remove from heat and allow pears to cool slightly. Transfer to bowls and serve warm, topped with whipped cream/yoghurt.

- recipe adapted from Everyday Food, photo cred to Simple Bites

Saturday, July 23, 2011

Maple Mustard Pork Chops

Well, I am now home recovering from round #6 of back surgery. When will it end? The only upside to going through these procedures is that my mum comes up to visits and takes really good care of me for a few days. On the way home from a walk today, she picked up a boat load of nice, fresh pork chops from Metro that were uber on sale. We split them all up into individual freezer bags and are now all set to go for weeks of delicious bbq'ed chops. This is a nice little recipe that I came across while perusing Canadian Living online. Yum, yum. The maple/mustard combo would be delicious on chicken too. Remember not to heat your grill too, too high as the sugar in the maple syrup can cause the ribs to char too quickly. Nice, slow steady heat will do it. We served these pork chops up with a yummy pasta salad and french bread. Bon appétit!


Ingredients
4 pork loin chops
2 tbsp honey or maple syrup
2 tbsp Dijon mustard
2 tbsp grainy mustard (or perhaps a few tbsp of mustard seeds)
1/2 tsp each salt and pepper

Directions
1. Heat grill to medium; lightly oil grates. Trim any fat from pork chops. Combine honey, Dijon and grainy mustards, salt and pepper; brush over both sides of pork chops. Save a tablespoon or 2 of sauce to brush on top when the chops are fully grilled.

2. Place on greased grill over medium heat or under broiler; close lid and grill, turning once, until juices run clear when chops are pierced and just a hint of pink remains inside, 8 to 10 minutes.

3. Brush with leftover sauce and serve. Enjoy!

Recipe cred: Canadian Living, photo Kalatogas

LONG LIVE THE BARBEQUE!

Friday, July 22, 2011

Bannock Bread (aka Twist!)

When I married into the Giles family, one of the traditions I soon discovered was that of roasting bannock, aka "twist", over a camp fire's hot coals. The bread is named "twist" because of how the dough is twisted around a stick. I also discovered that the same bread that we'd roast over the fire made an incredible quick bread (no-yeast) that we could make at home.

I love this recipe because it is super quick to mix up, it doesn't have to rise and takes only about 20 minutes to bake. The recipe below will feed a good 6-8 folks for dinner so you may want to cut the recipe in half if you're cooking for less. I've included instructions for cooking over an open fire and for making the bannock at home in the oven. Bon, bon appétit!

Ingredients:
4 cups flour (1/4 cup of which 12 grain flour)
1/2 tsp. salt
5 tsp. baking powder
1/3 cup brown sugar
1/4 cup finely chopped cold butter
1 1/2 cups water
optional: chopped mixed nuts, cranberries, lemon, blueberries, acorns...  you get the idea!

Directions:
Oven instructions:
1. Preheat oven to 400 degrees.

"oven bannock"
2. Mix the flour, salt, baking powder, sugar, optionals and the cold butter. Add the water last until a stiff dough forms. Knead on a floured surface and feel free to add a little bit more flour or water if needed.

3. Form the dough into a round/oblong loaf about 1" high. Bake on a GREASED baking sheet for 15-20 minutes until cooked through. Sometimes I have to cut the bread open to bake the middle when I make it a little too thick.

4. Serve warm with butter/jam/honey or just straight up. Enjoy!


Campfire instructions:
1. As above, mix the dough until a still dough forms.

2. Roll the dough into a long "log" shape and then wrap it securely around a 1" diameter stick that has had its end whittled free of the bark. You'll want to make sure that the dough is not too thick and not too thin as you'll be roasting it over hot coals - the idea is that you want the middle to cook without the outer part burning.

3. Roast your stick over the fire - a patient camper always wins out when it comes to bannock: keep the bread free from the flames and slowly turn it over a period of 10-15 minutes.

4. Serve with jam!

Fellow Gilesies roasting their twist over the open fire
Me!
A winter hot dog & twist roast in Muskoka 

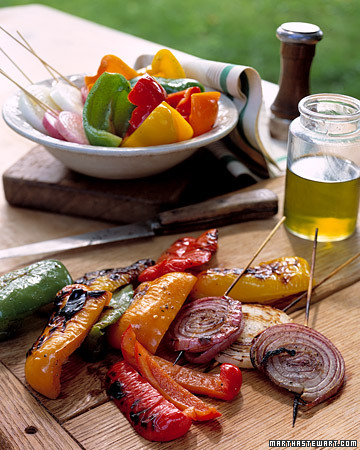
Grilled Mixed Peppers and Onions

Grilling veggies is such a classic summer side dish. I came across this recipe from Everyday Food that has you skewer your onions, almost like a lollypop! Skewering the onion slices through all the layers ensures ease of grilling and keeps pieces of onion from falling through the grill. You have to make sure that you have a fairly thick onion on there though or else they`ll just break when you stick your skewers through. Ingredients listed below are very general - go with what you like. Bon appétit!

Ingredients
1 white onion, peeled, cut into 1/4-inch-thick rounds
1 red onion, peeled, cut into 1/4-inch-thick rounds
1 green bell pepper, cut into quarters and seeded
1 red bell pepper, cut into quarters and seeded
1 orange bell pepper, cut into quarters and seeded
1 yellow bell pepper, cut into quarters and seeded
3 tablespoons olive oil
1/2 teaspoon coarse salt
1/2 teaspoon freshly ground black pepper

Directions
1. Soak wooden skewers 20 to 30 minutes. Heat a grill to medium. Skewer the white and red onion slices, passing the skewer through each layer; skewer the green, red, orange, and yellow peppers. Place the skewered vegetables, olive oil, salt, and pepper in a shallow bowl, and turn the vegetables until they are coated.

2. Place vegetables on grill, and cook until lightly charred, 6 to 8 minutes per side. Transfer vegetables to a cutting board. Cut peppers into 1/2-inch-thick slices, and remove skewers from onions. Transfer vegetables to a serving platter.

- recipe and photo cred to Everyday Food

Frozen Chocolate Covered Bananas

Bluth bananas anyone? These yummy little guys were a Giles' favourite when we first got married and are such a great summer treat. I've seen other recipes that have sprinkles and coconut on them too. I'm a fan of the straight up peanuts though. A bit messy to make, but so worth it! Bon appétit!


Ingredients
8 ounces semisweet chocolate, chopped
6 popsicle sticks or wooden skewers
2 bananas, peeled and cut crosswise into thirds
1/3 cup coarsely chopped salted peanuts

Directions
1. Place chocolate in a heatproof bowl set over (not in) a pan of gently simmering water. Stir just until melted.

For all you Arrested Development fans
out there, I'm sure you'll enjoy
 this sweet picture of George Michael
 at the Frozen Banana stand :)
2. Line a baking sheet with waxed paper. Insert a popsicle stick in one end of each banana piece. Dip banana, one piece at a time, in chocolate, spooning on additional chocolate to cover.

3. Sprinkle each banana with peanuts, and set on prepared baking sheet. Refrigerate until chocolate is firm, 20 minutes, or up to 3 days.

Saturday, July 16, 2011

Sautéed Zucchini, Peppers & Tomatoes

Such a fresh, vibrant little side dish. Yum yum yum. One eggplant short of a ratatouille but delicious none the less. I found that the ingredient amounts below were enough for Jerms and I to have a large serving each, so just double, triple, or more for a larger crowd. I definitely wouldn't recommend making this in advance, because it will most likely get soggy while waiting in the refrigerator. In fact, you'll want to serve it fresh and piping hot from the pan - just like a stir fry so that it doesn't go all gooby on you.  I served this dish as a side to some delicious pork chops and a baby spinach salad. The first dish I've cooked on the stove in 6 weeks... that's not bad! Bon appétit :)   

Ingredients
1 medium zucchini
1 yellow bell pepper
1 tablespoon olive oil
1/2 pint grape tomatoes
1/2 small red pepper
2 cloves garlic, smashed
handful of toasted cashews
Coarse salt and ground pepper

Directions
1. Quarter zucchini lengthwise; cut crosswise into 1/2-inch-thick pieces. Remove ribs and seeds from peppers; cut into 3/4-inch squares. Lightly toast cashews until fragrant in toaster oven or in a small frying pan.

2. Heat olive oil in a large skillet over medium-high heat. Add onion and cook until softened. Next add zucchini, peppers, tomatoes, and garlic; season with salt and pepper. Cook, tossing frequently, until vegetables are crisp-tender, 6 to 8 minutes.

- recipe cred: adapted from Everyday Food

Thursday, July 7, 2011

Frozen Fruit Skewers with Honey-Yogurt Dipping Sauce


Oooooooooooo look at these little guys! Kids`ll eat anything on a stick right? They'll be fooled in to thinking it's fun and down all of their fruit n' veggie servings in one sitting. I'm sure of it! This recipe encourages lots and lots of NIBBLING. Bon appétit!


Ingredients:
Skewers:
Fresh fruit (raspberries, grapes, strawberries, blackberries, kiwi ... you name it!)

Honey-Yogurt Dipping Sauce
¼ cup plain yogurt
2 teaspoons honey

Directions:
1. Fill your skewers up with fruit - your little guys can help out with this!
2. Freeze the skewers in an airtight container or a zip-top bag for at least 5 hours until frozen solid.

Pasta Salad with Feta & Snow Peas

We had a whole bunch of Gilesies up this weekend so decided to serve up this pasta salad for lunch. It was a hit! It made a 2nd appearance at our picnic on the Ottawa River the next night. If you're going to be making this dish the night before, just be sure to add your scallions and cilantro just before serving. We added a bunch more vinegar because that's just the way we roll ... bon appétit!

Ingredients
Coarse salt and ground pepper
1 pound fusilli, or other short pasta
4 ounces snow peas, strings removed, sliced diagonally into 1/2-inch-wide strips
1 yellow bell pepper, ribs and seeds removed, chopped into 1/2-inch pieces
2 scallions, thinly sliced
1/2 cup chopped fresh cilantro
1 cup (4 ounces) crumbled feta cheese
2 tablespoons olive oil
2 tablespoons white-wine vinegar
1 teaspoon balsamic vinegar

Directions
1. In a large pot of boiling salted water, cook fusilli until al dente, according to package instructions; add snow peas during last minute of cooking. Drain pasta and peas in a colander; rinse under cold water.

2. In a large bowl, combine pasta and peas, bell pepper, scallions, cilantro, feta, oil, vinegars, 1 teaspoon salt, and 1/4 teaspoon pepper; toss to combine. Serve chilled or at room temperature.

- recipe and photo cred to Martha

Berries with Buttermilk & Honey Frappé

Okay, so this dish is a whole lot like the one I posted a couple down, but hey, it's summer, it's berry season and that means NO BAKE. I havn`t actually cooked a meal inside in 5 weeks! We had a lactose intolerant in our midst when serving this dessert (hats off to you dad - you made it on the blog!) so I substituted soy milk instead of the buttermilk and added some frozen blueberries to the "frappé" ... love that word! The result = blue honey soy frappé. All in all, super tasty, super refreshing, super easy. If you do end up going with the buttermilk, why not make the frozen fruit cupcakes the following night? For some reason (at least here in Ottawa), they don`t sell 250 or even 500 mL containers of buttermilk, you have to go all out on the 1L. Who drinks 1L of buttermilk??  Bon appétit!


Ingredients
1 cups cold buttermilk
1/2 cup ice
2 tbs honey
1 1/2 cups mixed berries (any combination of strawberries, blueberries, blackberries, or raspberries)
1/4 cup fresh mint (optional)

Directions
Blend buttermilk, ice, and honey in a blender until frothy. Combine mixed berries with fresh mint. Divide iced buttermilk and berries among 4 to 6 bowls.
- pic and recipe cred

Chocolate Icebox Cake (no-bake!)

Ohhhhhhhhhhhhhhh so good. We used to make these icebox cakes all the time growing up. I`d take a giant piece and feel so darn sick at the end because of all the whipped cream. Enjoy. Feel jolly and fat when you're done. Mmmm. Bon appétit!

Ingredients
1 3/4 cups heavy cream, chilled
1/4 cup sugar
1 package (9 ounces) chocolate wafers
optional: 3/4 teaspoon mint extract

Directions
1. Make the whipped cream: With an electric mixer, beat heavy cream and sugar (+ mint extract if you're going for a minty flavour instead) until stiff peaks form.

2. Line a serving platter with two sheets of wax paper side by side. Assemble the cake: Spread each wafer with about 1/2 tablespoon mint cream, forming stacks. Lay stacks horizontally along seam of paper, pressing gently to form a log. With small spatula or knife, cover log with remaining mint cream. Refrigerate at least 4 hours or up to 2 days.

3. To serve, gently remove wax paper from underneath cake (holding cake in place with a metal spatula, if necessary), and sprinkle with chocolate chips. Slice cake diagonally with a serrated knife.

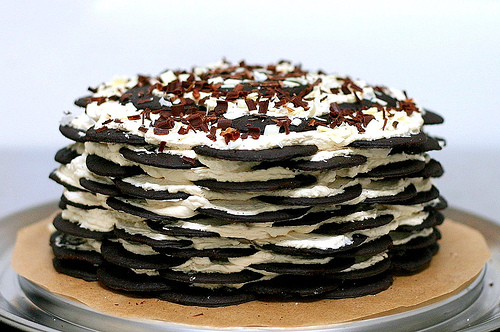
** I`ve also seen an icebox cake prepared in vertical layers in a more typical `cake` shape, like this one below. I'd guess that you'd need at least 2 if not 3 boxes of cookies to make this dessert:

Frozen Fruit Cupcakes


Okay folks. This is the frozen summer dessert to beat all frozen summer desserts. Bring these cutesies out of your freezer and you will be revered as the dessert goddess who rules with her golden whisk. They`re gorgeous, zippy and not crazy bad for you. Such a refreshing, cool treat for a hot summer day. Bon appétit!
ps - it pains, pains, PAINS me that I don't have a real picture of these cupcakes. This picture looks something like them but not exactly... Imagine a colourful buttermilk filled cupcake with half submerged pieces of fruit, nice and frosty... or, better yet - go pick yourself up a carton of buttermilk and make up some of your own!


Ingredients:
1 lemon
2 cups buttermilk 
1/2 cup sugar 
1/8 teaspoon salt 
2 cups assorted fresh fruit 
Garnishes: Lemon leaves, halved strawberries, blueberries, raspberries and nectarine wedges 

IMPORTANT NOTE: Begin about 3 -1/2 hours before serving or prepare a day ahead. 

Directions: 
1. Line (twelve) 2-1/2-inch muffin pan cups with fluted paper baking cups. 

2. Into a large bowl, grate peel from lemon. Add buttermilk, sugar and salt. With wire whisk; mix til blended. Gently stir in 1-1/4 cups fruit. Spoon mixture into paper baking cups. 

3. Top with remaining 3/4 cup fruit. Some fruit will stay above mixture for pretty color. Cover; freeze til firm, about 3 hours. Peel off paper baking cups from dessert.