Thursday, December 15, 2011

Chili Chicken Tenders

These little guys are super tasty - and healthy too! I had to make the topping mixture twice because I accidentally turned around and knocked the entire food processor container on the floor. Like a good little dog, Georgie started licking the mixture up, but stopped when he must have hit the red pepper flakes! Poor little guy acted like it bit him :(   I should note that the chicken strips are extra good paired with a smidgen of fresh-squeezed lemon juice. I also made up a yummy "maple yogurt mustard" mixture to go along with. To grind the almond powder, use a good quality blender, food processor, or hammer. Serve up with some nice salad and enjoy! Bon appétit!

Ingredients:
1/2 cup raw almonds, ground to a coarse powder
1/2 teaspoon red pepper flakes
1/2 teaspoon onion powder
1/2 teaspoon chili powder
1/2 teaspoon salt
1/4 teaspoon pepper
1/4 cup egg whites
2 chicken breasts, sliced into thin strips


Directions:
1. Preheat oven to 400 degrees. Line a baking dish with parchment or nonstick cooking spray.

2. In a small bowl, combine the ground almonds, red pepper flakes, onion powder, chili powder, salt, and pepper. Pour the egg whites over the chicken tenders. Dip them into the almond mixture. Transfer to your baking sheet. Bake in an oven for 10-12 minutes, or just until the chicken is cooked through. Serve and enjoy!

Saturday, December 10, 2011

Gnocchi in a Gorgonzola Cream Sauce

Jeremy and I simply adore this tiny little Italian restaurant up the road from us on Beechwood. It's called Arturos and it's named after the owner's 100 year old Grandpa. They have a small menu with daily specials, fresh pasta and everything is made to order. We were at Arturos' on Thursday night after Jerms presented his 4th year mech-eng project to celebrate. I decided to go for the Gnocchi with Gorgonzola sauce and Jeremy was left wishing he'd ordered the same thing. I just had to try it on my own and FAST.

If you are new to the gnocchi world, it is what you'd call potato pasta. They're super yummy little guys and they have the most addictive, dense texture that leaves you craving for more, more, more. Gorgonzola is a blue cheese which goes so incredibly well with this pasta dish. If you are not a blue-cheese lover, don`t fret. I too am one of these people and I LOVE this dish. It is so freakin` delicious. As in, you want to keep eating wayyy beyond your point of satiety. Serve with your favourite white wine and enjoy!!  Bonne appétit!


ps - I wish I was a keener and made my own gnocchi but that just didn't happen tonight... you can buy pre-made gnocchi at the grocery store. They boil to the surface in 2-3 minutes, just like pierogies.
pps - this dish is not fat free...


Ingredients:
- 1 package gnocchi (or make your own!)
- 1 tbs. butter
- 1 tbs. flour
- 2/3 cup milk
- 1/3 cup heavy cream
- 4.5 oz Gorgonzola cheese
- small flavourful grapes (not big juicy ones...)
- fresh pepper (to taste)
- Parmesan cheese (to taste)

Directions:
1. Boil water and cook gnocchi.
2. Prepare milk mixture before hand by heating it slowly in the microwave to about 70 degrees.
3. In a saucepan melt butter. When butter is melted, stir in flour (roux). Cook the roux over medium heat, stirring for about 3 minutes - do not brown.
4. Add the hot milk mixture and stir. Keep stirring while sauce starts to thicken and then blend in crumbled cheese until it has melted. Be careful not to cook too much as sauce may thicken too much. Add pepper to taste.
5. Toss the pasta with the sauce. Add the chopped grapes and serve with fresh parmesan cheese. Enjoy!

Monday, November 21, 2011

Chicken Taquitos with Salsa Verdé

So it seems that I`m in the mood lately for recreating my favourite appetizers from my favourite Ottawa restaurants. This one is a spin-off from Poncho Villa`s flautas (or the equally deep fried version slowly rolling away at your local 7-11 ... depending on who you ask ...).  In searching for `taquito` recipes, I also discovered that "Taquito" was also the name of a Star War's character (thank you Wookiepedia): Taquito (pronounced /ʈaqɪʈo/) a male Rodian pilot who lived during the last years of the Galactic Republic on the Outer Rimplanet Iego. Apparently Taquito died trying to breacbck through the laser grid system left by the Separatists.  Poor Taquito.

All that aside, the mexican appetizer version of these little guys are uber yummy. Kids would adore them, I'm certain of that. To deep fry the taquitos at home (not having a deep-fryer of course), we heated oil in a soup pot to the point that it was shimmering. We made sure to have enough oil to just cover the taquitos. I should note too that we had a lot of fun making up the salsa verdé too. The salsa lasted for a few days and was the perfect accompaniment to tortilla chips. Olé y buen appetito!

Ingredients:
For the chicken taquitos:
2 large chicken breasts, boiled and shredded
1/2 tablespoon cumin
1/2 tablespoon chili powder
1/2 tablespoon onion powder
1/2 teaspoon salt
1 cup pepper jack cheese, shredded
4-6 white corn tortillas
Oil for frying

For the salsa verdé:
1 1/2 cups yellow tomatoes
1/4 a small purple onion
a big bunch of cilantro
3 tablespoons vinegar
salt to taste

Directions:
For the taquitos:
Mix the chicken with the cumin, chili powder, onion powder, salt, and cheese until well mixed. Press 3-4 tablespoons of the chicken mixture together to form a "snake" that is then rolled tightly into a corn tortilla. To get really great taquitos, I placing the corn tortillas one at a time in very hot water for 3-5 seconds, then removing them quicky, rolling them around your chicken mixture, and allowing them to air dry for a few minutes before placing in a saucepan filled with an inch or so of oil heated to medium heat for frying. Fry the taquitos 2-3 at a time on all sides just until golden. Transfer to a plate lined with paper towels. Serve with salsa.

For the salsa verdé:
In a blender, puree all ingredients together. Serve with warm, fresh taquitos. Enjoy.

- Recipe cred Cheeky Kitchen

Thursday, November 17, 2011

Papadums

Last night I got to eat out with some of my most favourite people at one of my most favourite restaurants in Ottawa: the Coconut Lagoon. If you've never been, go.  It's freakin' delicious and I once saw Adrian Harwood eating dinner there with his wife (local newscaster ... he's big time here!). The Coconut Lagoon serves papadums as yummy pre-dinner appetizers. Papadums are those giant, round, bubbly, deep-fried crackery things that you get at Indian restaurants ... usually served up with some kind of delicious chutney. They are made from lentils and come in a variety of different flavours. It turns out that you can actually make these guys at home with a minimal amount of effort. You will feel like a super star - that is if you`re able to escape without searing your forearms in hot, burning oil. Warning: your first papadum will most probably fail. Don`t worry - you`ll get the hang of it! I should warn you as well that this is not a recipe for making papadums from scratch (I`m not that awesome) - check out your local T&T or 'international' aisle at the grocery store for a box of em'. Finally, you'll need a pair of tongs and quick reflexes -- these cook quickly. Bon appétit!

Ingredients:
One package of papadums
Oil
Mango Chutney

Directions:
Read the instructions on the package. We make ours up by heating up an inch or two of oil in a frying pan. To see if the oil is ready, crack off a small piece of papadum and drop it in the oil. If it fries up quickly it is ready to go. Do not put your papdums in the oil until it is good and ready and hot. Serve up with some nice mango chutney. Enjoy!

Sunday, November 13, 2011

Mixed Tomato Salsa

There's nothing better than making your own salsa. It's a perfect way to use up all of those huge, left-over, gnarly looking tomatoes that litter your garden at the end of summer. Our little Giles` garden was  positively overflowing with these guys so it was into the salsa pot with them. You can mix this recipe up by adding fresh mango or a big handful of black beans. Store-bought just doesn't compare when you've made your own! YUM. Bon appétit!


Ingredients
1 plum or regular tomato, cut into 1/4-inch pieces
12 yellow cherry tomatoes, cut into sixths
1 very small sweet onion, cut into 1/4-inch pieces
1 large jalapeno pepper, seeds and ribs removed, minced
1 serrano chile or 1/2 jalapeno pepper, seeds and ribs removed, minced
2 tablespoons chopped fresh cilantro
2 tablespoons fresh lime juice
Coarse salt and freshly ground black pepper, plus more to taste

Directions
1. In a medium bowl, combine tomatoes, onion, jalapeno, serrano, cilantro, lime juice; season with salt and pepper. Cover with plastic wrap and let sit at room temperature for 1 hour to allow the flavors to blend.

Chicken Puxa Vida

This dish is definitely a Giles' dish (hola' to all of the Giles' out there... you've got to try this one!). It is freakin' delicious. It was a lot of fun to make and is really different from standard everyday dinner fare. It could easily be done with tilapia as well (I have seen lots of recipes for this and, in fact, this recipe started out as a tilapia puxa vida recipe from Brooke from Cheeky Kitchen, I love her blog and look forward to every new post.) The sauce is a slightly sweet tomato sauce with coconut milk, lime, and cilantro. It is rich and flavourful and light at the same time. By the way, "Puxa Vida" means WOW in Portuguese, and you'll likely find that this recipe makes you feel wowalicious all over. Mmmmm. Bon appétit!


Ingredients:
1 red pepper
1/2 onion
1 jalapeno seeded
5 cloves garlic
1 Tablespoon olive oil
1 (13.5 ounce) can coconut milk
2 (15 ounce) cans roasted tomatoes
2 Tablespoons honey
juice of one lime
2 pounds chicken (or possibly tilapia?)
1/2 cup chopped cilantro
rice for serving
black beans

Directions:
1. Pulse together the red pepper, onion, jalapeno, and garlic until finely chopped.

2. Add the onion mixture to a saute pan coated with olive oil. Cook until soft, about 5 minutes.

3. Add the coconut milk, tomatoes, and honey to the pan.

4. Bring the mixture to a boil, then reduce the heat and let simmer until thickened, about 10 minutes. Add the lime juice and check for seasonings. You might need to add a little more honey or lime juice.

5. Add the chicken to the pan and cover with the sauce.

6. Bake in a preheated 350 degree oven for 40 to 45 minutes. To know that it is cooked through, it will be opaque.

7. Garnish with chopped cilantro and additional lime wedges. These are great served with baked rice and favorite black beans.

- recipe cred to Cheekykitchen.com

Sunday, October 23, 2011

Chicken Zucchini Pistou with Penné Pasta


First and foremost: What is Pistou you ask? I didn’t know either. Turns out that it is French pesto. You`ll definitely need a food processor for making this dish - something we invested in a couple of years back and couldn`t do without. That poor thing has been so over used that it now requires firmly inserting a pen (or BBQ skewer as is often handy) to engage the machine at all times while you`re using it.  

This dish was really yummy. Especially eating it with such wonderful ladies. The flavours are really rich yet subtle. Any cooking with cream is truly special. Truly truly. Pour yourself a big glass of wine and if you are really inspired make a salad and call it dinner. Bon appétit!

Ingredients (for 4):
4 teaspoons olive oil
2 1/2 cups sliced zucchini
1 cup packed basil leaves
1/2 cup shaved Parmesan cheese
2 Tablespoons toasted pine nuts
4 chopped garlic cloves
1 cup chopped chicken
2 cups chopped Vidalia (or other sweet onion)
1 3/4 teaspoons salt
8 ounces penne pasta
1/4 cup heavy cream
1/2 teaspoon pepper

Directions:
1. Heat 2 teaspoons of olive oil in a large saute pan. Add the zucchini and cook until tender and golden, about 5 minutes. Transfer to a plate and cool.

2. Put 1/4 cup of the cooked zucchini, basil, 1/4 cup cheese, pine nuts and garlic in the food processor.

3. Add the rest of the olive oil to the pan and add the onions. Cook for 10 minutes until the onions are brown. 1/2 way through, add the chicken and cook through. Cook the pasta in 6 quart of salted water. Reserve 1/3 cup cooking liquid to add to the processed zucchini mixture. Add the cooking liquid to the food processor and pulse until smooth.

4. Add the zucchini back to the pan with the pasta and the processed zucchini mixture. Add the heavy cream and salt and pepper. Cook for a few minutes until everything is heated through, maybe 22 minutes. Taste for seasonings (you may need more salt and more garlic... I did).

5. Pour the pasta into a big bowl and garnish with some basil leaves, pine nuts, and cheese.

- recipe & photo cred to Baked Bree

Sunday, October 16, 2011

General Tso`s Chicken

This dish might be what you'd call a DIY, healthified makeover of the General Tso' Chicken that you are used to seeing in your Chinese takeout box. Normally the chicken is coated in the egg white/cornstarch mixture and deep fried till golden brown. This version however is pan fried in a drizzle of oil olive oil until crisp and tender, making it not only quick enough to eat on a weeknight, but healthy enough to eat as often as you like. The fact that it requires no special ingredients, pastes or sauces makes it a great last minute dinner too. You could swap out the snow peas for whatever veggies you have on hand in your fridge or freezer. Just make sure you don`t skip out on the fresh ginger either. It gives the dish a real ZIP. If you`ve never cooked with fresh ginger before, give it a try - you`ll never go back to making stir frys with out it. Really, really yummy. Bon appétit!

Ingredients (serves 4):
1 1/4 cups long-grain brown rice
1/4 cup cornstarch
1 pound snow peas, trimmed and halved crosswise
4 garlic cloves, sliced
2 teaspoons fresh ginger, grated and peeled
3 tablespoons light-brown sugar
2 tablespoons soy sauce
1/2 teaspoon red-pepper flakes
2 large egg whites
Coarse salt and ground pepper
1 pound boneless, skinless chicken breasts, cut into 1-inch pieces
2 tablespoons vegetable oil, such as safflower

Directions
1. Cook rice according to package instructions. Meanwhile, in a large bowl, stir together 1 tablespoon cornstarch and 1/2 cup cold water until smooth. Add snow peas, garlic, ginger, sugar, soy sauce, and red-pepper flakes; toss to combine, and set aside.

2. In another bowl, whisk together egg whites, remaining 3 tablespoons cornstarch, 1/2 teaspoon salt, and 1/4 teaspoon pepper. Add chicken, and toss to coat.

3. In a large nonstick skillet, heat 1 tablespoon oil over medium-high. Lift half the chicken from egg-white mixture (shaking off excess), and add to skillet. Cook, turning occasionally, until golden, 6 to 8 minutes. Transfer to a plate; repeat with remaining oil and chicken, and set aside (reserve skillet).

4. Add snow-pea mixture to skillet. Cover; cook until snow peas are tender and sauce has thickened, 3 to 5 minutes. Return chicken to skillet (with any juices); toss to coat. Serve with rice.

Saturday, October 15, 2011

Peachy Pies (x-Small version)

During last week's pie bake-fest I ended up with a small amount of left over pie dough (certainly not enough for an entire pie but definitely too much just to throw out ... or eat). Into the freezer it went and made a second appearance at last night's dessert. My favourite pie crust recipe can be found ici. This particular pie is a little rustic and super simple. And how much fun is it to have an entire pie all to yourself? Bon appétit!

Ingredients:
- Pie dough
- sliced peaches (3-4?)
- sugar
- lemon juice

Directions:
1. Roll pie dough on a lightly floured surface. Cut dough to fit your individual tart shells. Fill shells with dough.

2. Thinly slice peaches and sprinkle with sugar and a dash of lemon juice (prevents the fruit from browning). Fill your individual pie shells with layers of peaches.

3. Bake at 350F until the crust browns (... 20 minutes - 1/2 hour?).  Enjoy!

Potato Chive Soup

It's officially fall when you start making soup on a Saturday afternoon. It`s great to prepare some lunches for the upcoming week and I am trying to use up all of the precious remainders of the onion corner in my garden. The quantities in this recipe are loosely guessed. That`s the great thing about making soup though - every batch will be different. This soup is creamy, comforting, bursting with so much flavour, and very good for you too (minus the sour cream, butter and cream... okay, so it`s not that good for you, but it is flavourful!)! Oh, not to mention inexpensive to make, which is always a bonus. Bon appétit!

Ingredients:
8 medium sized russet potatoes, cut into 1-inch pieces
1 sweet potato (if you have one)
4 cups canned chicken broth
1/2 cup (about) cream (I used 1/2 & 1/2)
2 tablespoon butter
1 onion
handful of chopped green onion
1/4 cup chopped fresh chives
1/3 cup sour cream
Salt and pepper
Additional sour cream & bacon bit for serving

Directions:
1. Sauté onion and green onions in 1 tbs. of butter until soft in a large soup pot. Pour in broth and chopped potatoes. Cover and simmer until potatoes are very tender, stirring occasionally, about 30 minutes. Let mixture cool slightly.

2. Purée potato mixture in batches in blender or processor - or, if you`re lucky, you own a fantastic hand blender (I`m one of those lucky people!). Return soup to saucepan. Stir in enough cream to thin to desired consistency. Mix in additional butter and chives. Bring to simmer. Remove from heat and mix in 1/3 cup sour cream. Season with salt and pepper. Serve, passing additional sour cream & bacon bits separately.

Overnight Curried Honey Chicken

This chicken recipe is perfect for those days when you know you won`t have a lot of energy to prepare dinner. While making the night before, quickly throw together the marinade for this recipe (seriously, the first step takes no more than 5 minutes). Then when dinner rolls around the next day, put the chicken in the oven and throw some green beans in the steamer, maybe a salad, and dinner is ready. This chicken is my favorite combination of sweet and savory. The marinade becomes a sauce and the chicken is incredibly tender. Really, you need to make this. Bon appétit!


Ingredients:
1/2 cup honey
1/3 cup Dijon mustard
1 Tablespoon curry powder
4 Tablespoons soy sauce
4 chicken breasts

Directions:
1. Mix together the honey, mustard, soy sauce, and curry powder.

2. This is so easy, it is ridiculous. Put the chicken and marinade in a plastic bag or glass container and marinate overnight.

3. The next day, put the chicken and the marinade in a pan and bake in a 350 degree oven for one hour covered with tin foil.

4. Uncover the chicken and baste. Cook another 15 minutes. Slice and top with some of the remaining sauce.

- recipe cred to Baked Bree

Fish Tacos with Salsa Verdé (with Tilapia)

I'll be the first to admit that when I first heard of "fish tacos" my stomach simply recoiled at the thought. In my mind, it just didn't seem natural. This recipe, however, was the exact opposite of what I think of when I think of fish tacos. These are light. Fresh tasting. Clean. Flavourful. They were so good that Jeremy and I were scraping the bits from the bottom of the pan.

A couple of very important notes about this recipe:
- I highly recommend you use tilapia fillets (or some other kind of hard white fish)
- Admittedly, I found the jalapeno/salad mixture very, very spicy - that was because I used a scotch bonnet from my garden and just about cried (ok, maybe I cried a little). So just becareful with the heat level of the pepper you are using.

Enjoy, and, as always... Bon appétit!


Ingredients
1 bunch fresh cilantro (roots and thick stems removed)
4 tablespoons fresh lime juice (from 2 limes)
3 tablespoons olive oil
Coarse salt and ground pepper
Handful of greens (arugula, baby spinach etc.)
3 scallions, thinly sliced
Making the salsa verdé was super easy with
the food processor
1/2 jalapeno chile (ribs and seeds removed, for less heat), minced
1 1/2 pounds skinless tilapia fillets (about 4)
1/2 teaspoon ground coriander
12 corn tortillas (6 inches each)
Avocado (for serving)

Directions
1. Heat broiler, with rack set 4 inches from heat. In a blender, combine cilantro, 2 tablespoons lime juice, 2 tablespoons oil, and 2 tablespoons water; season with salt and pepper (I also added a bit of cumin to the mix too). Blend until pureed. Set salsa aside.

2. In a small bowl, mix together remaining 2 tablespoons lime juice, remaining tablespoon oil, greens, scallions, and jalapeno (see notes above re: jalapeno!); season with salt and pepper. Set salad aside.

3. Place tilapia on a rimmed baking sheet; season with coriander, salt, and pepper. Broil until opaque throughout, 4 to 5 minutes; break up into chunks (we bbq'ed it instead).

4. Meanwhile, using tongs, hold tortillas over a gas flame until lightly toasted, about 30 seconds per side (or wrap stacked tortillas in damp paper towels, and microwave on high until warm and soft, about 1 minute). To assemble, fill tortillas with fish, jalapano/greens salad and avocado; top with salsa verde and fold.

- recipe adapted from Martha Stewart

Thursday, October 13, 2011

Buffalo Wing Sauce

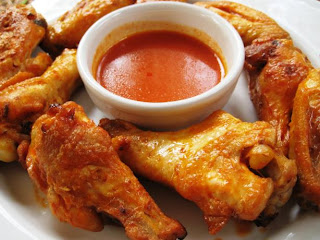
Mmmmm wings. How can you go wrong? This wing sauce is a super nice blend of sweet and hot, to make it you will need a few ingredients that you can buy at about any grocery store. If you're not a fan of heat, simply go easy on the Franks. We split the recipe in 1/2 for 2 people, but if you are 4, I imagine you'll be good with the amounts listed below. This recipe will make about a cup and a half of sauce.  Below are easy step by step instructions and the difficulty level is rated very easy, so if you want to grab your measuring cups, spoons and a small sauce pan I will meet you down at step 1.

Ingredients:
1 cup of Franks Red hot.
1 stick of butter or margarine
1 tsp of minced garlic or fresh garlic cloves.
1/4 cup of light brown sugar (less or more depending on how sweet you like it), I would recommend starting out with less, you can always add more.
1 tablespoon of worcestershire sauce.

Directions:
1. OK, this is the most difficult step and most important step so listen close. You need to pour Franks red hot sauce into a measuring cup until you reach 1 cup.

2. I know you didn't have a problem with step 1 so we will continue, pour the cup of hot sauce into the small sauce pan. Congratulations! we can move on

3. The butter, you can use real butter or margarine, I choose to cut the butter into 8 slices just because it melts a whole lot easier, so go ahead and slice up your cold butter and add it to the wing sauce in the pan.

4. We now add the brown sugar to the sauce pan. I would start out with 1/8 cup of brown sugar if you want just a touch of sweet with more heat, however I use 1/4 cup. You don't have to pack the 1/4 cup down just fill it up farley loose , level it out and pour it into the wing sauce.

5. Now you are ready to add the 1 teaspoon of minced garlic and the tablespoon of Worcestershire sauce to the sauce pan, once complete you can place the sauce pan on the stove at low to medium heat, stirring frequently. Make sure you don't leave unattended or the wing sauce will scorch and you will have to go back to step 1 or order out for diner because you just ruined the sauce!

6. You will want to stir the wing sauce on low to medium heat until you reach a slight rolling boil, once at boil stir frequently for about 2 minutes, you will notice the sauce changing color a little and slightly expanding this is good. After about 2 minutes you may turn off the heat.

7. You will now want to make sure the heat is turned off and the sauce pan is removed from the stove if you are using an electric stove. Set a timer for about 30 minutes and cover the sauce pan. 

Sunday, August 14, 2011

Lemon Sugar Snap Peas

Hazaa to a simple, light and refreshing summer side dish. These peas are so delicious - remember not to overcook them so that they stay nice and crunchy. Enjoy! Bon appétit :)

Ingredients
1 lemon, rind removed + juiced
8 ounces sugar snap peas, strings removed
2 tablespoons extra-virgin olive oil
Coarse salt and freshly ground pepper

Directions
Quickly blanch your peas (or, for a slightly less healthy but method that I always use, cook your peas in a frying pan on medium heat with a dab of butter) . Pour lemon juice and rind over peas, and drizzle with oil (you don't have to use the oil if you've cooked in butter); toss to coat. Season with salt and pepper.

Wednesday, July 27, 2011

Blackened Cayenne Chicken

Remarkably, it's now been almost 2 months since we last made dinner inside. I'm sure that this is doing wonders for our electricity/AC costs. Instead of using a pre-made spice rub, why not make your own? This rub uses ingredients that you should be able to find in your own spice cupboard and is delicious! The more cayenne you add the spicier it'll be :)  I guess our finished product didn't exactly blacken per se, but I'm sure you could end up with that result if you were ambitious enough.  Bon appétit!


Ingredients
1 tablespoon olive oil, plus more for grill
1 teaspoon paprika
2 teaspoons ground pepper
1 1/2 teaspoons coarse salt
1 teaspoon cayenne pepper
1/2 teaspoon dried oregano
1/2 teaspoon dried thyme
1 garlic clove, minced
4 bone-in, skin-on chicken breast halves (2 1/2 pounds total)

Directions
1. Set up a grill for indirect cooking over medium-high. Clean and lightly oil hot grill. In a bowl, combine paprika, ground pepper, salt, cayenne, oregano, thyme, garlic, and oil; rub on chicken.

2. Grill chicken, skin side down, directly over heat source until skin is browned, about 4 minutes. Flip chicken; move to cooler side of grill. Cover grill and cook chicken until cooked through, 35 to 40 minutes. Transfer to a platter and tent with foil. Let chicken rest 10 minutes.

Recipe cred Everyday Food

Tuesday, July 26, 2011

BBQ'ed Sweet Chili Chicken Pizza

Mum Giles, this recipe is for you! 


Now how cool is this recipe? I mean really? BBQ'ing pizza. Wow. Had never done that before. This recipe may be taking the whole grilling experience to a new level. The ultimate BBQ adventure. You'll definitely want a buddy when you're making this dish because it can move REALLY quickly. The important thing to note is that when you first put your dough on the grill, you are initially cooking the top side of the pizza that will eventually house your ingredients on (seems backwards... I know!).  It will become obvious as you prepare your pizza, but just to clarify things:
1) the side of the dough you oil will eventually be the top side of the pizza (this side is cooked down first)
2) when the top side is cooked, flip the dough (so that the cooked side is on top) and add your toppings
3) put your 1/2 cooked dough with the toppings now on it back on the grill (toppings up of course :)

Depending on your ingredients, you may want to toss your pizza in the oven to broil it for a minute or two before serving. Bon, bon appétit!


Ingredients
3 tablespoons olive oil
All-purpose flour, for shaping dough
1 pound pizza dough (either purchase at store, or, better yet make your own)
Sauce: Sweet Chili Sauce for Chicken*
Pizza toppings: cooked chicken, scallions, crumbled goat cheese, avocado, red onion, red pepper, grated cheese etc.

* a note on the sauce: this is not garlicky or spicy, but rather a nice sweet sauce with a hint of chili spice. The bottle looks something like this:

Directions
1. Heat grill to medium. Brush a large rimless baking sheet (or an inverted rimmed sheet) with 1 tablespoon oil (we use our panini press sheets). On a lightly floured work surface, roll and stretch dough to two 8-inch ovals or rounds. Transfer to prepared sheet. Brush tops with 1 tablespoon oil.

2. Place crusts on your baking sheets oil side down. Transfer dough to grill. Cook, without turning over, until undersides are firm and begin to char, 2 to 3 minutes. Using tongs and a large spatula,

3. Scatter crusts with sweet chili sauce, grilled chicken, scallions, cheese, red onion and red pepper; and slide back onto grill. Cook, rotating occasionally, until cooked through and cheese begins to melt, 3 to 5 minutes.  Be very careful to watch your crust to ensure it doesn`t burn. Transfer to a cutting board.

4. Serve with some nice avocado and spinach on top. You may need to broil your pizza in the oven for a couple of minutes if you want that grilled top look. It will certainly be grilled on the bottom though. Enjoy!

Grilled Lemon Garlic Chicken

This is such an easy, tasty dish. No marinading. Just lemony deliciousness on your plate in 1/2 an hour. I definitely recommend working with thinner pieces of chicken so that they cook through quickly and evenly (and so that you don't end up with charred chicken on the outside, pink totally uncooked chicken on the inside). Oh to the hot days of summer.... so perfect for the bbq. Bon appétit!

Ingredients:
2 tablespoons fresh lemon juice
2 tablespoons extra-virgin olive oil, plus more for grill
1 small garlic clove, minced
1 tsp freshly cracked pepper
8 boneless, skinless chicken thighs (about 2 pounds total)

Directions
1. Heat grill to high; lightly oil grates. Mince 1 garlic clove, and place in a shallow dish. Add lemon juice and 1 tablespoon oil; season with salt and pepper. Add chicken, and toss to coat. Let stand at room temperature at least 5 minutes (and up to 30).

2. Brush bread on both sides with remaining 2 tablespoons oil; season with salt and pepper. Grill bread until beginning to char, about 1 minute per side. Cut remaining garlic clove in half, and rub cut sides over grilled bread; set bread aside (discard garlic clove).

3. Grill chicken until opaque throughout, 1 to 3 minutes per side. Serve with fresh lemon wedges.

- recipe and photo cred to Everyday Food

Monday, July 25, 2011

Pears Glazed with Maple Syrup

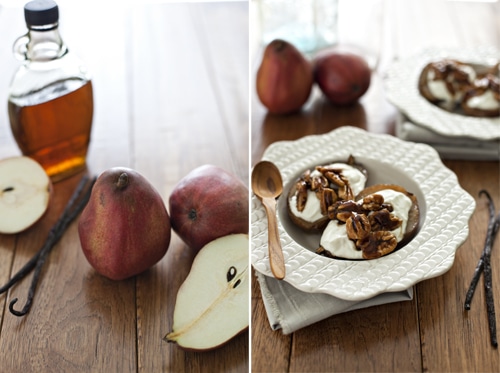
Who doesn't love a nice, fresh pear? This dessert is really quite lovely for the pear lovers out there. It would make a nice brunchy-breakfast too. Make sure not to skip the lemon juice step as this is important for ensuring that the pears don`t brown too quickly. The original recipe called for fresh heavy cream, but I`ve suggested going with yoghurt for a slightly more healthier bent. Picking up some nicely pressed yoghurt would be just devine with this dish. If it`s a special occasion though, go for it with the cream. No regrets. A big thanks to my mum for finding this recipe for us. Bon appétit!

Ingredients1/2 cup heavy cream (or substitute yoghurt for a healthier twist)
1/4 teaspoon ground cardamom
1/4 teaspoon vanilla
3 Comice pears (about 1 3/4 pounds)
1 tablespoon lemon juice
1 1/2 tablespoons unsalted butter
3 tablespoons pure maple syrup
handful of roasted walnuts, pecans or almonds

Directions
1.In a chilled mixing bowl, combine cream, vanilla and cardamom and whip until cream holds soft peaks. Alternatively, mix cardamom and vanilla with fresh plain or pressed yoghurt. Refrigerate, covered.

2.Quarter or half pears, core, and peel. If desired, cut quarters in half. Sprinkle with lemon juice.

3.Melt butter in a large skillet over medium-high heat. Arrange pears in skillet and cook on one side until pears just begin to brown, about 3 minutes. Add maple syrup and cook until pears are tender, about 1 minute more. Turn pears and cook for another minute. Remove from heat and allow pears to cool slightly. Transfer to bowls and serve warm, topped with whipped cream/yoghurt.

- recipe adapted from Everyday Food, photo cred to Simple Bites

Saturday, July 23, 2011

Maple Mustard Pork Chops

Well, I am now home recovering from round #6 of back surgery. When will it end? The only upside to going through these procedures is that my mum comes up to visits and takes really good care of me for a few days. On the way home from a walk today, she picked up a boat load of nice, fresh pork chops from Metro that were uber on sale. We split them all up into individual freezer bags and are now all set to go for weeks of delicious bbq'ed chops. This is a nice little recipe that I came across while perusing Canadian Living online. Yum, yum. The maple/mustard combo would be delicious on chicken too. Remember not to heat your grill too, too high as the sugar in the maple syrup can cause the ribs to char too quickly. Nice, slow steady heat will do it. We served these pork chops up with a yummy pasta salad and french bread. Bon appétit!


Ingredients
4 pork loin chops
2 tbsp honey or maple syrup
2 tbsp Dijon mustard
2 tbsp grainy mustard (or perhaps a few tbsp of mustard seeds)
1/2 tsp each salt and pepper

Directions
1. Heat grill to medium; lightly oil grates. Trim any fat from pork chops. Combine honey, Dijon and grainy mustards, salt and pepper; brush over both sides of pork chops. Save a tablespoon or 2 of sauce to brush on top when the chops are fully grilled.

2. Place on greased grill over medium heat or under broiler; close lid and grill, turning once, until juices run clear when chops are pierced and just a hint of pink remains inside, 8 to 10 minutes.

3. Brush with leftover sauce and serve. Enjoy!

Recipe cred: Canadian Living, photo Kalatogas

LONG LIVE THE BARBEQUE!

Friday, July 22, 2011

Bannock Bread (aka Twist!)

When I married into the Giles family, one of the traditions I soon discovered was that of roasting bannock, aka "twist", over a camp fire's hot coals. The bread is named "twist" because of how the dough is twisted around a stick. I also discovered that the same bread that we'd roast over the fire made an incredible quick bread (no-yeast) that we could make at home.

I love this recipe because it is super quick to mix up, it doesn't have to rise and takes only about 20 minutes to bake. The recipe below will feed a good 6-8 folks for dinner so you may want to cut the recipe in half if you're cooking for less. I've included instructions for cooking over an open fire and for making the bannock at home in the oven. Bon, bon appétit!

Ingredients:
4 cups flour (1/4 cup of which 12 grain flour)
1/2 tsp. salt
5 tsp. baking powder
1/3 cup brown sugar
1/4 cup finely chopped cold butter
1 1/2 cups water
optional: chopped mixed nuts, cranberries, lemon, blueberries, acorns...  you get the idea!

Directions:
Oven instructions:
1. Preheat oven to 400 degrees.

"oven bannock"
2. Mix the flour, salt, baking powder, sugar, optionals and the cold butter. Add the water last until a stiff dough forms. Knead on a floured surface and feel free to add a little bit more flour or water if needed.

3. Form the dough into a round/oblong loaf about 1" high. Bake on a GREASED baking sheet for 15-20 minutes until cooked through. Sometimes I have to cut the bread open to bake the middle when I make it a little too thick.

4. Serve warm with butter/jam/honey or just straight up. Enjoy!

Campfire instructions:
1. As above, mix the dough until a still dough forms.

2. Roll the dough into a long "log" shape and then wrap it securely around a 1" diameter stick that has had its end whittled free of the bark. You'll want to make sure that the dough is not too thick and not too thin as you'll be roasting it over hot coals - the idea is that you want the middle to cook without the outer part burning.

3. Roast your stick over the fire - a patient camper always wins out when it comes to bannock: keep the bread free from the flames and slowly turn it over a period of 10-15 minutes.

4. Serve with jam!

Fellow Gilesies roasting their twist over the open fire
Me!
A winter hot dog & twist roast in Muskoka 

Grilled Mixed Peppers and Onions

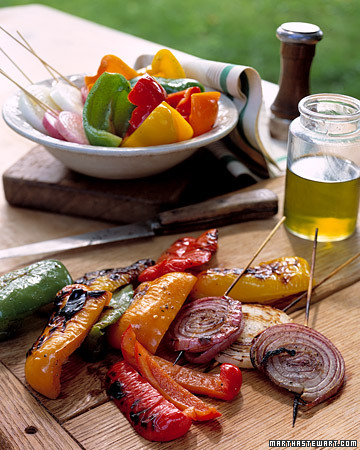
Grilling veggies is such a classic summer side dish. I came across this recipe from Everyday Food that has you skewer your onions, almost like a lollypop! Skewering the onion slices through all the layers ensures ease of grilling and keeps pieces of onion from falling through the grill. You have to make sure that you have a fairly thick onion on there though or else they`ll just break when you stick your skewers through. Ingredients listed below are very general - go with what you like. Bon appétit!

Ingredients
1 white onion, peeled, cut into 1/4-inch-thick rounds
1 red onion, peeled, cut into 1/4-inch-thick rounds
1 green bell pepper, cut into quarters and seeded
1 red bell pepper, cut into quarters and seeded
1 orange bell pepper, cut into quarters and seeded
1 yellow bell pepper, cut into quarters and seeded
3 tablespoons olive oil
1/2 teaspoon coarse salt
1/2 teaspoon freshly ground black pepper

Directions
1. Soak wooden skewers 20 to 30 minutes. Heat a grill to medium. Skewer the white and red onion slices, passing the skewer through each layer; skewer the green, red, orange, and yellow peppers. Place the skewered vegetables, olive oil, salt, and pepper in a shallow bowl, and turn the vegetables until they are coated.

2. Place vegetables on grill, and cook until lightly charred, 6 to 8 minutes per side. Transfer vegetables to a cutting board. Cut peppers into 1/2-inch-thick slices, and remove skewers from onions. Transfer vegetables to a serving platter.

- recipe and photo cred to Everyday Food

Frozen Chocolate Covered Bananas

Bluth bananas anyone? These yummy little guys were a Giles' favourite when we first got married and are such a great summer treat. I've seen other recipes that have sprinkles and coconut on them too. I'm a fan of the straight up peanuts though. A bit messy to make, but so worth it! Bon appétit!


Ingredients
8 ounces semisweet chocolate, chopped
6 popsicle sticks or wooden skewers
2 bananas, peeled and cut crosswise into thirds
1/3 cup coarsely chopped salted peanuts

Directions
1. Place chocolate in a heatproof bowl set over (not in) a pan of gently simmering water. Stir just until melted.

For all you Arrested Development fans
out there, I'm sure you'll enjoy
 this sweet picture of George Michael
 at the Frozen Banana stand :)
2. Line a baking sheet with waxed paper. Insert a popsicle stick in one end of each banana piece. Dip banana, one piece at a time, in chocolate, spooning on additional chocolate to cover.

3. Sprinkle each banana with peanuts, and set on prepared baking sheet. Refrigerate until chocolate is firm, 20 minutes, or up to 3 days.

Saturday, July 16, 2011

Sautéed Zucchini, Peppers & Tomatoes

Such a fresh, vibrant little side dish. Yum yum yum. One eggplant short of a ratatouille but delicious none the less. I found that the ingredient amounts below were enough for Jerms and I to have a large serving each, so just double, triple, or more for a larger crowd. I definitely wouldn't recommend making this in advance, because it will most likely get soggy while waiting in the refrigerator. In fact, you'll want to serve it fresh and piping hot from the pan - just like a stir fry so that it doesn't go all gooby on you.  I served this dish as a side to some delicious pork chops and a baby spinach salad. The first dish I've cooked on the stove in 6 weeks... that's not bad! Bon appétit :)   

Ingredients
1 medium zucchini
1 yellow bell pepper
1 tablespoon olive oil
1/2 pint grape tomatoes
1/2 small red pepper
2 cloves garlic, smashed
handful of toasted cashews
Coarse salt and ground pepper

Directions
1. Quarter zucchini lengthwise; cut crosswise into 1/2-inch-thick pieces. Remove ribs and seeds from peppers; cut into 3/4-inch squares. Lightly toast cashews until fragrant in toaster oven or in a small frying pan.

2. Heat olive oil in a large skillet over medium-high heat. Add onion and cook until softened. Next add zucchini, peppers, tomatoes, and garlic; season with salt and pepper. Cook, tossing frequently, until vegetables are crisp-tender, 6 to 8 minutes.

- recipe cred: adapted from Everyday Food

Thursday, July 7, 2011

Frozen Fruit Skewers with Honey-Yogurt Dipping Sauce


Oooooooooooo look at these little guys! Kids`ll eat anything on a stick right? They'll be fooled in to thinking it's fun and down all of their fruit n' veggie servings in one sitting. I'm sure of it! This recipe encourages lots and lots of NIBBLING. Bon appétit!


Ingredients:
Skewers:
Fresh fruit (raspberries, grapes, strawberries, blackberries, kiwi ... you name it!)

Honey-Yogurt Dipping Sauce
¼ cup plain yogurt
2 teaspoons honey

Directions:
1. Fill your skewers up with fruit - your little guys can help out with this!
2. Freeze the skewers in an airtight container or a zip-top bag for at least 5 hours until frozen solid.

Pasta Salad with Feta & Snow Peas

We had a whole bunch of Gilesies up this weekend so decided to serve up this pasta salad for lunch. It was a hit! It made a 2nd appearance at our picnic on the Ottawa River the next night. If you're going to be making this dish the night before, just be sure to add your scallions and cilantro just before serving. We added a bunch more vinegar because that's just the way we roll ... bon appétit!

Ingredients
Coarse salt and ground pepper
1 pound fusilli, or other short pasta
4 ounces snow peas, strings removed, sliced diagonally into 1/2-inch-wide strips
1 yellow bell pepper, ribs and seeds removed, chopped into 1/2-inch pieces
2 scallions, thinly sliced
1/2 cup chopped fresh cilantro
1 cup (4 ounces) crumbled feta cheese
2 tablespoons olive oil
2 tablespoons white-wine vinegar
1 teaspoon balsamic vinegar

Directions
1. In a large pot of boiling salted water, cook fusilli until al dente, according to package instructions; add snow peas during last minute of cooking. Drain pasta and peas in a colander; rinse under cold water.

2. In a large bowl, combine pasta and peas, bell pepper, scallions, cilantro, feta, oil, vinegars, 1 teaspoon salt, and 1/4 teaspoon pepper; toss to combine. Serve chilled or at room temperature.

- recipe and photo cred to Martha

Berries with Buttermilk & Honey Frappé

Okay, so this dish is a whole lot like the one I posted a couple down, but hey, it's summer, it's berry season and that means NO BAKE. I havn`t actually cooked a meal inside in 5 weeks! We had a lactose intolerant in our midst when serving this dessert (hats off to you dad - you made it on the blog!) so I substituted soy milk instead of the buttermilk and added some frozen blueberries to the "frappé" ... love that word! The result = blue honey soy frappé. All in all, super tasty, super refreshing, super easy. If you do end up going with the buttermilk, why not make the frozen fruit cupcakes the following night? For some reason (at least here in Ottawa), they don`t sell 250 or even 500 mL containers of buttermilk, you have to go all out on the 1L. Who drinks 1L of buttermilk??  Bon appétit!


Ingredients
1 cups cold buttermilk
1/2 cup ice
2 tbs honey
1 1/2 cups mixed berries (any combination of strawberries, blueberries, blackberries, or raspberries)
1/4 cup fresh mint (optional)

Directions
Blend buttermilk, ice, and honey in a blender until frothy. Combine mixed berries with fresh mint. Divide iced buttermilk and berries among 4 to 6 bowls.
- pic and recipe cred

Chocolate Icebox Cake (no-bake!)

Ohhhhhhhhhhhhhhh so good. We used to make these icebox cakes all the time growing up. I`d take a giant piece and feel so darn sick at the end because of all the whipped cream. Enjoy. Feel jolly and fat when you're done. Mmmm. Bon appétit!

Ingredients
1 3/4 cups heavy cream, chilled
1/4 cup sugar
1 package (9 ounces) chocolate wafers
optional: 3/4 teaspoon mint extract

Directions
1. Make the whipped cream: With an electric mixer, beat heavy cream and sugar (+ mint extract if you're going for a minty flavour instead) until stiff peaks form.

2. Line a serving platter with two sheets of wax paper side by side. Assemble the cake: Spread each wafer with about 1/2 tablespoon mint cream, forming stacks. Lay stacks horizontally along seam of paper, pressing gently to form a log. With small spatula or knife, cover log with remaining mint cream. Refrigerate at least 4 hours or up to 2 days.

3. To serve, gently remove wax paper from underneath cake (holding cake in place with a metal spatula, if necessary), and sprinkle with chocolate chips. Slice cake diagonally with a serrated knife.

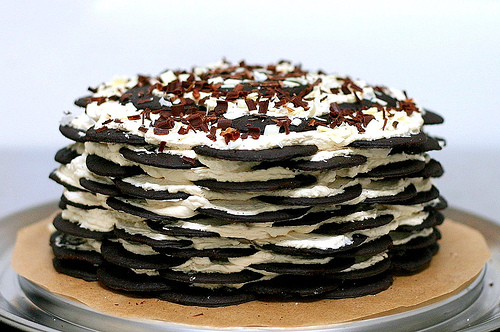
** I`ve also seen an icebox cake prepared in vertical layers in a more typical `cake` shape, like this one below. I'd guess that you'd need at least 2 if not 3 boxes of cookies to make this dessert:

Frozen Fruit Cupcakes


Okay folks. This is the frozen summer dessert to beat all frozen summer desserts. Bring these cutesies out of your freezer and you will be revered as the dessert goddess who rules with her golden whisk. They`re gorgeous, zippy and not crazy bad for you. Such a refreshing, cool treat for a hot summer day. Bon appétit!
ps - it pains, pains, PAINS me that I don't have a real picture of these cupcakes. This picture looks something like them but not exactly... Imagine a colourful buttermilk filled cupcake with half submerged pieces of fruit, nice and frosty... or, better yet - go pick yourself up a carton of buttermilk and make up some of your own!


Ingredients:
1 lemon
2 cups buttermilk 
1/2 cup sugar 
1/8 teaspoon salt 
2 cups assorted fresh fruit 
Garnishes: Lemon leaves, halved strawberries, blueberries, raspberries and nectarine wedges 

IMPORTANT NOTE: Begin about 3 -1/2 hours before serving or prepare a day ahead. 

Directions: 
1. Line (twelve) 2-1/2-inch muffin pan cups with fluted paper baking cups. 

2. Into a large bowl, grate peel from lemon. Add buttermilk, sugar and salt. With wire whisk; mix til blended. Gently stir in 1-1/4 cups fruit. Spoon mixture into paper baking cups. 

3. Top with remaining 3/4 cup fruit. Some fruit will stay above mixture for pretty color. Cover; freeze til firm, about 3 hours. Peel off paper baking cups from dessert.

Tuesday, June 28, 2011

Classic Coleslaw

Such a classic summer dish. So versatile and fresh on a hot summer day. As an FYI, these measurements are what one might call strongly "guesstimated" as I really didn't measure anything at all. Just go for it - any combination you make will probably taste great and "coleslaw" is a very loose term anyways. I don't like my coleslaw very 'mayonnaisey' but many folks do so feel free to play around with the quantities of ingredients. I also recently heard of a 'blueberry coleslaw' that I think I'll have to try (and post!) sometime soon. Bon appétit folks!

Ingredients
1 cabbage
2/3 cup creamy salad dressing (like Miracle Whip)
3 tablespoons vegetable oil
1/2 cup white sugar
1 tablespoon cider vinegar
1 apple
1/4 teaspoon salt
1/2 teaspoon poppy seeds

Directions
1. Thinly chop your cabbage, shred carrot & apple and combine in a large bowl.

2. Whisk together the salad dressing, vegetable oil, sugar, vinegar, salt, and poppy seeds in a medium bowl; blend thoroughly. Pour dressing mixture over coleslaw mix and toss to coat. Chill before serving.

Monday, June 27, 2011

Garlicky Roasted Asparagus

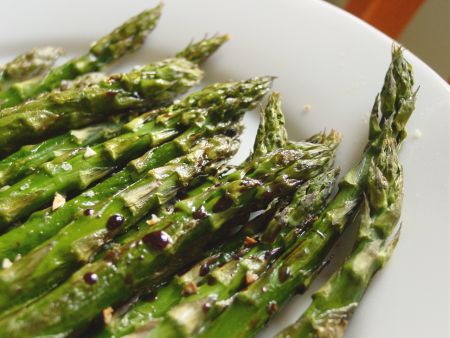
I love asparagus. Among all the vegetables, it's probably one of my favourite (besides baby spinach maybe... and broccoli, I also really love broccoli). I have recently been thinking of growing my own in the garden - have any of you ever tried growing asparagus? Everything I have read though says that it will probably take at least  three years before I can chew on a homegrown asparagus stalk. Three years. That will make me 30. Hmm. Homegrown asparagus + 3 years = 30. I can only hope to harvest my own 30 asparagus by the time I hit 30. Gardening certainly teaches one to be patient. 

This is a delicious, vibrant side. Having a quality garlic press will make things a WHOLE lot easier for you. Easy goes it on the oil though as these guys can get quite oily quite quickly. Bon appétit!


Ingredients
2 pounds asparagus, trimmed
2 tablespoons olive oil
4 garlic cloves, thinly sliced or pressed
Coarse salt and ground pepper

Directions
Preheat oven to 400 degrees. On a large rimmed baking sheet, toss asparagus with oil and garlic; season with salt and pepper. Roast until tender and browned in spots, 15 to 18 minutes. Serve warm or at room temperature.

- recipe cred Everyday Food; picture EEE Cooks

Sunday, June 26, 2011

Mango Chicken Salad

Yum. So easy. So simple. So tasty. And, possibly best of all, it's so darn good for you. What more can I say? Bon appétit!

Ingredients
4 cups arugula (or any other greens)
1 mango, peeled and sliced into 1-inch-long pieces
1 red pepper, trimmed, seeded, and sliced into 1-inch-long pieces
1 tablespoons extra-virgin olive oil
1/2 teaspoons balsamic vinegar
Sea salt
2 teaspoons honey
1 teaspoons Dijon mustard
1 boneless chicken breast (about 4 ounces)
1/4 cup slivered almonds
+ anything else you like in your salad!

Directions
1. In a large bowl, combine arugula, mango, and red pepper. In another, smaller bowl, whisk together olive oil, vinegar, and a pinch of salt. Set aside.

2. In a shallow, wide bowl, stir together honey and mustard. Add chicken and toss to evenly coat.

3. Grill chicken over medium-high heat (or cook in a skillet with 2 teaspoon olive oil) until golden brown, 8 to 10 minutes, turning once halfway through. When done, chicken should register about 165 degrees on a meat thermometer, and juices should run clear when pierced with a knife. Transfer to a cutting board and let sit 5 to 7 minutes.

4. Slice chicken into 1-inch-long pieces. Add to salad; toss to combine. Add balsamic vinaigrette and almonds; toss again before serving.

- recipe & photocred Delish.com

Saturday, June 25, 2011

BBQ'ed Jerk Chicken

Homemade jerk chicken? Oh soooooo good. Such authentic flavours and smells, I`m telling you guys - it was truly amazing man. We have a pre-made jerk seasoning that we often use to make this dish, but today I felt like trying to make this recipe from scratch. The result? I`m throwing out that pre-fab crap. It just didn`t compare. Jerk seasoning, if you are unfamiliar with it, is based on two main ingredients - chili peppers (or habaneros) and allspice, and is a Caribbean staple. You can make your seasoning plenty spicy if that`s what floats your boat and the leftovers are great the next day in a chicken salad. Serve up with some plantains or rice and a very large glass of über cold beer.Warning: this is a marinading dish that takes a couple of hours so you`ll want to try this recipe on a Saturday or possibly even prepare it the night before or something. Taking the time to marinade the chicken REALLY pays off so it`s not a step you want to skip.  Bon appétit!


Ingredients
1 bunch scallions, chopped (3/4 cup)
1 garlic cloves, chopped
1/2 a jalapeno chile, chopped (ribs and seeds removed, for less heat)
1 tablespoon freshly squeezed lime juice
1 tablespoon olive oil, plus more for grates
1/2 tablespoon light-brown sugar
1 teaspoons ground allspice
1/2 teaspoon dried thyme
1/4 teaspoon ground cinnamon
Coarse salt
4 pieces bone-in chicken (drumsticks and thighs), skinned and trimmed of excess fat

Directions
1. Make marinade: In a blender, combine scallions, garlic, jalapeno, lime juice, oil, sugar, allspice, thyme, cinnamon, 1/2 teaspoon salt, and 1 tablespoon water; blend until smooth. Set aside 1/8 cup for brushing.

2. Place chicken in a shallow dish; season all over with salt. Pour remaining marinade over chicken; toss to coat. Cover; refrigerate, turning once or twice, at least 2 hours, or up to overnight.

3. Heat grill to medium-high; oil grates. Lift chicken from marinade, letting excess drip off (discard marinade); place on grill, and cover. Cook, turning occasionally, until chicken is blackened in spots, about 10 minutes.

4. Move chicken to a cooler part of the grill; brush with reserved marinade. Grill, covered, until chicken is cooked through, 10 to 15 minutes more. Serve immediately.

Monday, June 20, 2011

Shrimp Scampi

"Shrimp scampi". Sounds so gourmet that it must be incredibly difficult - right? Heck no. Cooking up this dish will testify to the fact that fancy does not always mean hours in the kitchen. Scampi is possibly one of the the most popular ways to cook up shrimpies and the nice thing about it is that it's super easy and super quick (no more than 10 minutes from start to finish - booya!).

For this recipe, you can use either raw or precooked shrimp. If you are using the precooked variety, cook them just long enough to heat them and coat them with that wonderful garlic butter sauce. You'll need to thaw them first though and don't forget to rinse em' out. We served our shrimp with sides of baked sweet chili sweet potatoes and oven asparagus. Bon appétit!

Ingredients:
About a dozen large shrimp
2 tablespoons butter
2 tablespoons minced garlic
2 green onions, thinly sliced
1/8 cup dry white wine
1 tablespoon lemon juice, fresh if possible + zest
1 tablespoon chopped fresh parsley
salt and pepper, to taste

Directions:
1. Rinse shrimp and set aside. Heat butter in large skillet over medium heat. Cook garlic 1 or 2 minutes or until softened but not browned.

2. Add shrimp, green onions, wine, zest and lemon juice; cook until shrimp are pink and firm, about 1 to 2 minutes on each side. Do not overcook.

3. Add chopped parsley and salt and pepper before serving. Garnish with lemon slices and parsley sprigs if desired.


- recipe cred Diana Rattray

Thursday, June 9, 2011

Stove-Top Popcorn

Anyone who knows me knows that I love stove-top popcorn. Just love it. I feel that it's almost a lost art that needs to be preserved and passed down to the generations to follow. My Papa died when I was only 4-5 and one of the very few memories that I have of him is him shaking away the popcorn pot at the stove - sparks flying from the friction on the electric burner! So why should you make popcorn on the stove-top and not just throw in a package of the microwave variety? Well, there's a couple of reasons:

1) With homemade popcorn, you can control the amount of butter and salt. 
2) You don't get that icky film on the roof of your mouth from the artificial flavourings in microwave popcorn. 
3) Stove top popcorn has a much richer taste and you end up with significantly less left-over non-popped kernels
4) Making your own popcorn is much, MUCH cheaper than buying the microwave packs. For less than the price of a box of 3 microwave popcorn packs, you can buy a bag of popcorn and get 33 batches out of it. Yes, 33. You just can't beat that. Bon appétit!

Ingredients:
3 Tbsp vegetable oil (essentially, just enough to cover the bottom of your pot)
1/4 cup popcorn kernels
3 Tbsp butter, melted
Salt to taste

Directions:
On medium high heat, add the oil and 1-2 kernels to a large pot. Once the kernels pop, add the remaining kernels and immediately cover the pan. Shake the pot constantly (and I mean SHAKE IT!) until you don't hear any more popping, about 2 minutes. Remove pan from heat and pour popcorn into a large bowl. Drizzle the melted butter over the popcorn and season with salt.

ps - if you'd like a video tutorial, click here :)

Wednesday, June 8, 2011

Orange & Thyme Grilled Shrimp

More grilled shrimp, what can I say? It's so delicious! This recipe makes up a tasty little dipping sauce that can also be used as a salad dressing. I'm dedicating this recipe to my dear friend and babysitting buddy, Farnaz. This was my first attempt at making dinner with a 1 year old ... needless to say, I did a lot of "supervising". I did make the marinade myself though and surrendered to my love affair of cooking with oranges. The oranges truly were really loved today. So loved that I grated off all their fragrant zest and reamed the crap out of them to steal all their juices. I hope they know they are appreciated. We served these shrimpies up with a nice plate of greens and some naan. Bon appétit!

Ingredients
1 pound large shrimp (about 24), peeled and deveined, tails on
1 1/2 teaspoons grated orange zest, plus 1/2 cup fresh orange juice
2 garlic cloves, minced
2 tablespoons olive oil, plus more for grates
1 tablespoon plus 1 teaspoon chopped fresh thyme
Coarse salt and ground pepper
1/3 cup light mayonnaise

Directions
1. In a shallow dish, combine shrimp, 1 teaspoon zest, 1/4 cup juice, garlic, oil, 1 tablespoon thyme, 1/2 teaspoon salt, and teaspoon pepper; toss to coat. Marinate in the refrigerator for 30 minutes (or up to 8 hours). Soak eight 8-inch wooden skewers in water 30 minutes before cooking.

2. In a small bowl, combine mayonnaise, remaining 1/2 teaspoon zest, remaining 1/4 cup juice, and remaining 1 teaspoon thyme; season dipping sauce with salt and pepper.

3. Heat grill to medium; lightly oil grates. Thread shrimp onto skewers, and grill, turning once, until shrimp are opaque throughout, 3 to 4 minutes. Serve shrimp with dipping sauce.

- recipe and photo cred to Martha Stewart Everyday Food

Tuesday, June 7, 2011

Bok Choy, Carrot & Apple Colslaw

This coleslaw turned out to be quite a treat. I had never thought about using bok choy in coleslaw before but why not? It's cabbage pure and simple. Bok choy is so darn good for you too. A big boost of Vitamins A & C. The carrots and great for your eyes too. The freshly grated ginger gave the dish quite a zingy flavour. While talking ginger, I highly recommend that you stick to the suggested 1tsp and don`t overdo it or the ginger can totally take over the flavour. One final note is that this recipe has no mayonnaise, which is nice - just natural flavours from the sweet apple, peppery bok choy, and tangy lemon juice. We served this up with some classic grilled hamburgers. Bon appétit!

Ingredients
1 pound baby bok choy (4 to 6 heads)
1 teaspoon coarse salt
1 peeled apple, cut into matchsticks
2 large shredded carrots
1 tablespoon finely chopped red onion
3 tablespoons fresh lemon juice
1 tablespoon vegetable oil
1 teaspoon finely grated peeled fresh ginger
Coarse salt and ground pepper

Directions
1. Halve baby bok choy lengthwise; rinse under cold water to remove grit. Cut crosswise into thin strips; place in a large colander, and sprinkle with coarse salt. Toss to coat. Top with a plate that fits inside colander; weight with a heavy object (such as a skillet or canned goods). Set aside in sink to drain.

2. In a large bowl, mix apple, carrots, lemon juice, vegetable oil, and peeled fresh ginger. Add bok choy; season with coarse salt and ground pepper. Toss.
- photo cred delish.com